Today, we’ll say “They did not put it there” as lot. And start with DrawingBrush. Yes, there is no Drawing Brush in Silverlight, thus you cannot create neither hatch brush nor pattern brush in Silverlight. But we want it to be there. What to do? To enter into deep reflection
first thing to do is to look into Reflector. How they did another brushes… What’s the mess?
DependencyProperty.RegisterCoreProperty(0x5ef4, typeof(double));
Now very helpful. At least we know that we have TileBrush (one helpful property – Tile). What’s next? Let’s try to understand how DrawingBrush should work. Actually, it should draw our control on other surface. We cannot do this – drawing in Silverlight uses internal unmanaged methods from core dll. But we can try copy actual controls. what’s the problem? Let’s do it.
First of all, we should get the content of our UserControl – WPF, Content property of UserControl is internal! Why? “They did not put it there” (second time) Also we do not know externally when all UIElement loaded. Why? you know, ‘cos no Loaded accessible externally. “They did not put it there”. I do not want to write every time the same code, so the only way to get the content is to seek by name. But we do not know what the name of controls! Reflection! We’ll get all fields of our root control and then look for every panel
How to get and set Content property of Page (UserControl) externally.
FrameworkElement root = Application.Current.RootVisual as FrameworkElement;
FieldInfo[] fields = root.GetType().GetFields(BindingFlags.Public | BindingFlags.NonPublic | BindingFlags.Instance | BindingFlags.DeclaredOnly);
for (int i = 0; i < fields.Length; i++)
{
if (fields[i].FieldType.IsSubclassOf(typeof(Panel)))
{
Panel p = fields[i].GetValue(root) as Panel;
SetPattern(p);
}
}
Well, now we can get the panel and just replace Background property (the usual place of brushes) and Children property (to add actual controls inside the panel
if (p.Background == this)
{
p.Background = null;
SetPatternImpl(p.ActualWidth, p.ActualHeight);
p.Children.Insert(0, Pattern);
}
else if (this.Pattern!=null && p.Children.Contains(this.Pattern))
{
SetPatternImpl(p.ActualWidth, p.ActualHeight);
}
Good. Now we should multiply the control. Let’s go old good WPF way and clone by using XamlReader/XamlWriter solute. WTF? There is no XamlWriter in Silverlight - “They did not put it there”. What to do? Clone ‘em all!
How to clone objects in Silverlight without XamlWriter
We need reflection. A lot of reflection, so we’ll create extended method for DependencyObject type, that clone for us the objects without XamlWriter. First of all we should create new instance of target class
public static T Clone<T>(this T source) where T : DependencyObject
{
Type t = source.GetType();
T no = (T)Activator.CreateInstance(t);
Then travel recursively inside the type get all DependencyProperties and DependencyObjects. We need DependencyProperty to use system setter and DependencyObjects to clone them too. What is DependencyProperty from reflection point of view? It’s Static, Public and not Public ReadOnly Field. So, we’ll look for those.
Type wt = t;
while (wt.BaseType != typeof(DependencyObject))
{
FieldInfo[] fi = wt.GetFields(BindingFlags.Static | BindingFlags.Public);
for (int i = 0; i < fi.Length; i++)
{
{
DependencyProperty dp = fi[i].GetValue(source) as DependencyProperty;
Now all values of Dependency Properties are Dependency Objects or it’s ancestors, so we should be very smart (also we do not want NameProperty of cause)
if (dp != null && fi[i].Name != "NameProperty")
{
DependencyObject obj = source.GetValue(dp) as DependencyObject;
if (obj != null)
{
object o = obj.Clone();
no.SetValue(dp, o);
}
else
{
Also, there are some DependencyProperties, that we cannot set. How to detect them? Inside DependencyProperty class there are only two methods (Register and RegisterAttached) and no fields. Why there is no IsReadOnly (or something) property? “They did not put it there”. As well as we cannot know what the target type of the property. Another “They did not put it there”. So, we should do it manually
else
{
if(fi[i].Name != "CountProperty" &&
fi[i].Name != "GeometryTransformProperty" &&
fi[i].Name != "ActualWidthProperty" &&
fi[i].Name != "ActualHeightProperty" &&
fi[i].Name != "MaxWidthProperty" &&
fi[i].Name != "MaxHeightProperty" &&
fi[i].Name != "StyleProperty")
{
no.SetValue(dp, source.GetValue(dp));
}
}
And recursive call at the end
wt = wt.BaseType;
}
Now we have all Dependency Properties. What’s about regular CLR properties? We need them too. Let’s grab it
PropertyInfo[] pis = t.GetProperties();
for (int i = 0; i < pis.Length; i++)
{
if (
pis[i].Name != "Name" &&
pis[i].Name != "Parent" &&
pis[i].CanRead && pis[i].CanWrite &&
!pis[i].PropertyType.IsArray &&
!pis[i].PropertyType.IsSubclassOf(typeof(DependencyObject)) &&
pis[i].GetIndexParameters().Length == 0 &&
pis[i].GetValue(source, null) != null &&
pis[i].GetValue(source,null) == (object)default(int) &&
pis[i].GetValue(source, null) == (object)default(double) &&
pis[i].GetValue(source, null) == (object)default(float)
)
pis[i].SetValue(no, pis[i].GetValue(source, null), null);
This will work fine for regular properties, but not for lists. There we should Add()/Get()/Remove() Items we cannot just set them. what’s the problem?
else if (pis[i].PropertyType.GetInterface("IList", true) != null)
{
int cnt = (int)pis[i].PropertyType.InvokeMember("get_Count", BindingFlags.InvokeMethod, null, pis[i].GetValue(source, null), null);
for (int c = 0; c < cnt; c++)
{
object val = pis[i].PropertyType.InvokeMember("get_Item", BindingFlags.InvokeMethod, null, pis[i].GetValue(source, null), new object[] { c });
object nVal = val;
DependencyObject v = val as DependencyObject;
if(v != null)
nVal = v.Clone();
pis[i].PropertyType.InvokeMember("Add", BindingFlags.InvokeMethod, null, pis[i].GetValue(no, null), new object[] { nVal });
}
}
Very well. Now we have our brand new clones ready for reuse. All we have to do is to add and layout them.
void SetPatternImpl(double width, double height)
{
Pattern = new WrapPanel();
Pattern.Width = width;
Pattern.Height = height;
Pattern.HorizontalAlignment = HorizontalAlignment.Stretch;
Pattern.VerticalAlignment = VerticalAlignment.Stretch;
double xObj = (1 / this.Viewport.Width);
double yObj = (1 / this.Viewport.Height);
for (int i = 0; i < Math.Ceiling(xObj*yObj); i++)
{
Shape ns = this.Drawing.Clone();
ns.Stretch = this.TileMode == TileMode.None?Stretch.None:Stretch.Fill;
ns.Width = Pattern.Width / xObj;
ns.Height = Pattern.Height / yObj;
ScaleTransform st = new ScaleTransform();
st.ScaleX = this.TileMode == TileMode.FlipX | this.TileMode == TileMode.FlipXY ? -1 : 1;
st.ScaleY = this.TileMode == TileMode.FlipY | this.TileMode == TileMode.FlipXY ? -1 : 1;
ns.RenderTransform = st;
Pattern.Children.Add(ns);
}
}
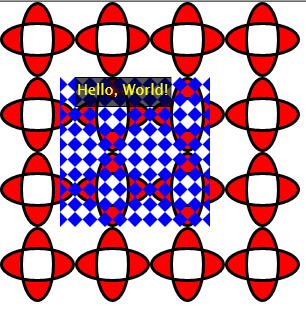
We done. How to use our bush? Simple, with regular Xaml syntax
<Grid x:Name="LayoutRoot" Width="300" Height="300">
<Grid.Background>
<l:DrawingBrush Viewport="0,0,0.25,0.25" TileMode="Tile">
<l:DrawingBrush.Drawing>
<Path Stroke="Black" Fill="Red" StrokeThickness="3">
<Path.Data>
<GeometryGroup>
<EllipseGeometry RadiusX="20" RadiusY="45" Center="50,50" />
<EllipseGeometry RadiusX="45" RadiusY="20" Center="50,50" />
</GeometryGroup>
</Path.Data>
</Path>
</l:DrawingBrush.Drawing>
</l:DrawingBrush>
</Grid.Background>
<Canvas Width="150" Height="150" x:Name="canvas">
<Canvas.Background>
<l:DrawingBrush Viewport="0,0,0.1,0.1" TileMode="FlipX">
<l:DrawingBrush.Drawing>
<Polygon Fill="Blue" Points="0,0 1,1 1,0 0,1"/>
</l:DrawingBrush.Drawing>
</l:DrawingBrush>
</Canvas.Background>
<TextBox Foreground="Yellow" Background="#AA000000" Text="Hello, World!" Height="30"/>
</Canvas>
</Grid>
I used my WrapPanel within this sample. It’s easy to build custom controls in Silverlight, much easier, then Brushes. Why? Because “They did not put it there”.
How to build layout control in Silverlight
Really simple. 1 – subclass panel
public class WrapPanel : Panel
{
Override MeasureOverride
protected override Size MeasureOverride(Size availableSize)
{
foreach (UIElement child in Children)
{
child.Measure(new Size(availableSize.Width, availableSize.Height));
}
return base.MeasureOverride(availableSize);
}
Then ArrangeOverride and you done!
protected override Size ArrangeOverride(Size finalSize)
{
Point point = new Point(0, 0);
double maxVal = 0;
int i = 0;
if (Orientation == Orientation.Horizontal)
{
double largestHeight = 0.0;
foreach (UIElement child in Children)
{
child.Arrange(new Rect(point, new Point(point.X + child.DesiredSize.Width, point.Y + child.DesiredSize.Height)));
if (child.DesiredSize.Height > largestHeight)
largestHeight = child.DesiredSize.Height;
point.X = point.X + child.DesiredSize.Width;
if ((i + 1) < Children.Count)
{
if ((point.X + Children[i + 1].DesiredSize.Width) > finalSize.Width)
{
point.X = 0;
point.Y = point.Y + largestHeight;
maxVal += largestHeight;
largestHeight = 0.0;
}
}
i++;
}
if (AllowAutosizing)
{
finalSize.Height = maxVal;
//this is ugly workaround, 'cos ScrollViewer uses Height property instead of ActualHeight
if (this.Height != maxVal)
SetValue(HeightProperty, maxVal);
}
}
else
{
double largestWidth = 0.0;
foreach (UIElement child in Children)
{
child.Arrange(new Rect(point, new Point(point.X + child.DesiredSize.Width, point.Y + child.DesiredSize.Height)));
if (child.DesiredSize.Width > largestWidth)
largestWidth = child.DesiredSize.Width;
point.Y = point.Y + child.DesiredSize.Height;
if ((i + 1) < Children.Count)
{
if ((point.Y + Children[i + 1].DesiredSize.Height) > finalSize.Height)
{
point.Y = 0;
point.X = point.X + largestWidth;
maxVal += largestWidth;
largestWidth = 0.0;
}
}
i++;
}
if (AllowAutosizing)
{
finalSize.Width = maxVal;
//this is ugly workaround, 'cos ScrollViewer uses Width property instead of ActualWidth
if (this.Width != maxVal)
SetValue(WidthProperty, maxVal);
}
}
return base.ArrangeOverride(finalSize);
}
We done. Here how it looks like. Have a nice day and be good people
This is not final control, there are some limitations
- It works with Panels only
- It does not layout (thus you cannot use it with StackPanel for example)
- You should name hosting control (I explained why)
- For drawings inside DrawingBrush you can use only Shape derived classes (e.g. Line, Polygon, Ellipse, Path etc)
You are more, then welcome to enhance this control, ‘cos it does not looks like Microsoft going to have DrawingBrush in RTM of Silverlight. The only request is – submit and share your enhancements to help all other developers and make their live easier with this necessary control. Source code for this article


