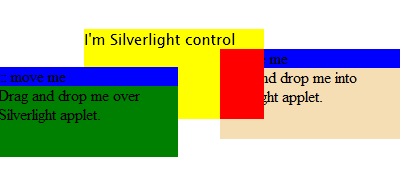
Silverlight is great new technology. It makes us possible to get access to almost all hosting HTML, including it's scripts, and behaviors. Today, we'll speak about how to create Drag-n-Drop between HTML page and Silverlight control. Here the result
So, let's start. First of all we have to create Silverlight control. Next, two HTML div elements with regular HTML Drag-and-drop capabilities. You can find a lot of such scripts in internet. I used my own. Then connect everything and run. You'll be able to drag the HTML control over your page, but when you'll approach into Silverlight activeX, you'll feel your mouse to slow response and the HTML control will be under Silverlight one, even if it's z-order will be much higher. What's the problem? The answer is simple - Silverlight bubbles mouse event to HTML page thus while you moving your mouse over SL, the response time will be decreased and z-index will be lowest. To get rid of it, you have to put a single property in Silverlight host Javascript, that will make you able to manage z-order of the SL control as you do it for all other HTML controls. Take a look into createSilverlight JS function inside TestPage.html.js. You'll notice following script
function createSilverlight()

{


Silverlight.createObjectEx({


source: "Page.xaml",

parentElement: document.getElementById("SilverlightControlHost"),

id: "SilverlightControl",

properties: {


width: "100%",

height: "100%",

version: "1.1",

enableHtmlAccess: "true"


},

events: {}


});


// Give the keyboard focus to the Silverlight control by default

 document.body.onload = function() {

 var silverlightControl = document.getElementById('SilverlightControl');

 if (silverlightControl)

 silverlightControl.focus();


 }


}
Now put isWindowless: "true" under enableHtmlAccess property (don't forget comma before). Now you are able to put any HTML element over Silverlight control and all events will come first into HTML page, and then into SL control.
Next step is to notify Silverlight about approaching HTML control. How to do it? The answer is attaching to the hosting page event and measurements. Get document and attach to it's onmousemove event.
InitializeComponent();


 d = HtmlPage.Document;

 d.AttachEvent("onmousemove", docMouseMove);
Now, get the absolute position of Silverlight control in your HTML page
el = d.GetElementByID("HTMLControlHost");

 HtmlElement host = d.GetElementByID("SilverlightControlHost");

 string x = host.GetStyleAttribute("left") ?? "0";

 string y = host.GetStyleAttribute("top") ?? "0";

 position = new Point(int.Parse(x.ToLower().Replace("px", string.Empty)), int.Parse(y.ToLower().Replace("px", string.Empty)));
And now, hide adorner, you'll use to move HTML element inside Silverlight
c = (Canvas)this.FindName("canv");

 c.SetValue<double>(Canvas.LeftProperty, this.Width);

 c.SetValue<double>(Canvas.TopProperty, this.Height);
Well done. The only thing remains is to handle mousemove event and after checking of moved element position and light calculations, translate it position to the position of your adorner.
void docMouseMove(object s, HtmlEventArgs e)

 {


 string sx = (el.GetStyleAttribute("left") ?? "0").ToLower().Replace("px", string.Empty);

 string sy = (el.GetStyleAttribute("top") ?? "0").ToLower().Replace("px", string.Empty);


 int x = int.Parse(sx);

 int y = int.Parse(sy);


 if ((x) < position.X + this.Width && y < position.Y + this.Height)

 {


 c.SetValue<double>(Canvas.LeftProperty, x - position.X);

 c.SetValue<double>(Canvas.TopProperty, y - position.Y);

 }


 else

 {

 c.SetValue<double>(Canvas.LeftProperty, this.Width);

 c.SetValue<double>(Canvas.TopProperty, this.Height);

 }


 }
We done. Now you can handle Drag And Drop HTML elements into or over Silverlight controls. This way, you can even drag Silverlight controls out to HTML page (this is regular DIV element after all)
No comments:
Post a Comment