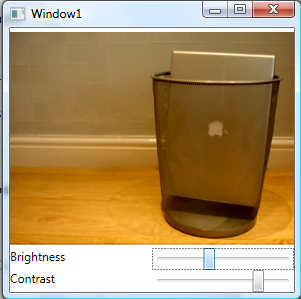
While being in flight, I had to learn new features, introduced in .NET 3.5 SP1. So, let’s start from image manipulation. I want to perform contrast and brightness manipulation in GPU over displayed image. In order to begin, you should download and install .NET 3.5 SP1 and Visual Studio 2008 SP1. Meanwhile (it’s about 500 MB of download) we’ll learn how to write custom shader effect.

In order to build custom Shader Effer, we have to use HLSL (High Level Shading Language). This is programming language, introduces in DirectX 9.0 and supports the shader construction with C-like syntax, types, expressions and functions. If you know C – it will be very easy for you to learn it.
What is shader? Shader is consists of vertex shader and pixel shader. Any 3D model flows from application to the vertex shader, then pixel shader frames buffer. So we’ll try from simple matrix transformation. First we should build the struct of the position. It is float4 type and has POSITION inheritance. Also we have to get matrix, which is regular float4x4 object. Then all we have to to is to translate inpos by matrix and return new position. That’s exactly what following code does.
float4 main(float4 inpos : POSITION, uniform float4x4 ModelViewMatrix) : POSITION
{
return mul(inpos, ModelViewMatrix);
}
So by using HLSL we can play freely with vertexes, but what’s happen with pixel shader? This works exactly the same way. We have pixel, which is TEXCOORD in input and COLOR in output. So, here it comes
float4 main(float2 uv : TEXCOORD, float brightness, float contrast) : COLOR
{
float4 color = tex2D(input, uv);
return (color + brightness) * (1.0+contrast)/1.0;
}
For more information about HLSL, please visit MSDN. As for us, we already have our shader effect and how we have to compile it into executable filter. In order to do it, we’ll use directx shader effect compiler. Let’s say, that we have our source in effect.txt file and our output file will be effect.ps. Small tip insert following line into pre-build event, and have your shader effect script ready and up-to-day with each compilation.
fxc /T ps_2_0 /E main /Fo"$(ProjectDir)effect.ps" "$(ProjectDir)effect.txt"
Mode information about FX compiler command switches, can be found here. How we should actually wrap our effect in manage code. But wait. We have to pass parameters into shader effect. How to register external parameters within FX file? Simple. Exactly as input params. Note, the tag inside register method will actually be used within our managed wrapper.
sampler2D input : register(s0);
float brightness : register(c0);
float contrast : register(c1);float4 main(float2 uv : TEXCOORD) : COLOR
{
float4 color = tex2D(input, uv);
float4 result = color;
result = color + brightness;
result = result * (1.0+contrast)/1.0;
return result;
}
Well done. Let’s build wrapper. Of cause you should inherit from ShaderEffect object and register your input param
public class BrightContrastEffect : ShaderEffect
{
…public Brush Input
{
get { return (Brush)GetValue(InputProperty); }
set { SetValue(InputProperty, value); }
}public static readonly DependencyProperty InputProperty = ShaderEffect.RegisterPixelShaderSamplerProperty("Input", typeof(BrightContrastEffect), 0);
Then load pixel shader from application resources (you should compile ps file as “Resource”)
private static PixelShader m_shader = new PixelShader() { UriSource = new Uri(@"pack://application:,,,/CustomPixelRender;component/bricon.ps") };
Then parameters (they are regular dependency objects) with additional special PixelShaderConstantCallback, that received the numeric id of registered properties from pixel shader effect.
public float Brightness
{
get { return (float)GetValue(BrightnessProperty); }
set { SetValue(BrightnessProperty, value); }
}public static readonly DependencyProperty BrightnessProperty = DependencyProperty.Register("Brightness", typeof(double), typeof(BrightContrastEffect), new UIPropertyMetadata(0.0, PixelShaderConstantCallback(0)));
public float Contrast
{
get { return (float)GetValue(ContrastProperty); }
set { SetValue(ContrastProperty, value); }
}
A couple of updates and we done with code behind.
public BrightContrastEffect()
{
PixelShader = m_shader;
UpdateShaderValue(InputProperty);
UpdateShaderValue(BrightnessProperty);
UpdateShaderValue(ContrastProperty);}
Next step is XAML. Each UI element in .NET 3.5 SP1 got new property, named Effect, that designed to hold your custom shader effects (exactly as it was with transformations in 3.0 and 3.5). I want to perform a transformation over image.
<Image Source="img.jpg">
<Image.Effect>
<l:BrightContrastEffect
Now we should build two sliders to manage brightness and contrast level
<UniformGrid Grid.Row="1">
<TextBlock Text="Brightness"/>
<Slider Maximum="1" Minimum="-1" Name="bVal"/>
<TextBlock Text="Contrast"/>
<Slider Maximum="1" Minimum="-1" Name="cVal"/>
</UniformGrid>
And bind to its values from our pixel shader effect
<Image Source="img.jpg">
<Image.Effect>
<l:BrightContrastEffect
Brightness="{Binding ElementName=bVal, Path=Value}"
Contrast="{Binding ElementName=cVal, Path=Value}"/>
</Image.Effect>
</Image>
That’s all, folks. Please note, that everything, done with shader effects, done in GPU. Also, the effect applies on rendered object (you can set the same effect not only to image, but to any UIElement in your system. Thus from performance point of view it’s the best method to work with your output. Let’s take for example very big image (3000x3000 pixels), rendered with low quality to 300x300 size. Perform per-pixel transformation (what we done here) will take 300X300Xdpi loops. While if you’ll perform the same operating over source image or memory section, used to create it, you’ll have to do 3000x3000xdpi loops, which is x10^2 more times.
Have a nice day and be good people.
1 comment:
Hi Tamir,
Hope you are doing well. This article helped me to achieve brightness and contrast problem in WPF. I have a small problem using this application. I have a Grid control which has a background image and inside the grid there is another image with transparent background. I f I try to control the brightness of the image with transparent background, upon increasing brightness, the transparency is lost and the the whole image turns white. If you wish, i can send you the source code. Please help me to resolve my issue.
Regards
Kalyan
Post a Comment