Showing posts with label microsft. Show all posts

Friday, December 12, 2008

Reading and decoding RDS (Radio Data System) in C#

RDS or Radio Data System is very common in US and many European countries. It is communication protocol used to send small amount of digital information using regular FM radio broadcast. This protocol is used to "tell" your receiver about alternative frequencies, time, program notifications, program types, traffic information and regular text (such as singer name or genre). Unfortunately in Israel RDS is not very common and there is very limited number of radio stations broadcasts RDS information.

image

How RDS works?

As mentioned earlier, it uses FM subcarrier to broadcast digital information. It was designed to support 10 and 18 characters numeric and 80 characters alphanumeric displays. RDS operates at 1187.5 bps and based on 26-bit word consisting of 16 data and 10 error detection bits. Due to the fact, that FM carrier is not very reliable, error code allows correct information to be received even if an error of 3-5 bits exists within 26 bit block. Each four data blocks interpreted as 104-bit signal and named "group". Depending of the type of information, contained within the group, as different group type code is defined and transmitted within the group as upper five bits code. Even if more, then 104 bits required to completely send the information, there is no requirement that the next segment of the transmission be sent in the next group. There are 32 known groups types, defined by RFC:

private enum groupType : byte {
   RDS_TYPE_0A = (0 * 2 + 0),
   RDS_TYPE_0B = (0 * 2 + 1),
   RDS_TYPE_1A = (1 * 2 + 0),
   RDS_TYPE_1B = (1 * 2 + 1),
   RDS_TYPE_2A = (2 * 2 + 0),
   RDS_TYPE_2B = (2 * 2 + 1),
   RDS_TYPE_3A = (3 * 2 + 0),
   RDS_TYPE_3B = (3 * 2 + 1),
   RDS_TYPE_4A = (4 * 2 + 0),
   RDS_TYPE_4B = (4 * 2 + 1),
   RDS_TYPE_5A = (5 * 2 + 0),
   RDS_TYPE_5B = (5 * 2 + 1),
   RDS_TYPE_6A = (6 * 2 + 0),
   RDS_TYPE_6B = (6 * 2 + 1),
   RDS_TYPE_7A = (7 * 2 + 0),
   RDS_TYPE_7B = (7 * 2 + 1),
   RDS_TYPE_8A = (8 * 2 + 0),
   RDS_TYPE_8B = (8 * 2 + 1),
   RDS_TYPE_9A = (9 * 2 + 0),
   RDS_TYPE_9B = (9 * 2 + 1),
   RDS_TYPE_10A = (10 * 2 + 0),
   RDS_TYPE_10B = (10 * 2 + 1),
   RDS_TYPE_11A = (11 * 2 + 0),
   RDS_TYPE_11B = (11 * 2 + 1),
   RDS_TYPE_12A = (12 * 2 + 0),
   RDS_TYPE_12B = (12 * 2 + 1),
   RDS_TYPE_13A = (13 * 2 + 0),
   RDS_TYPE_13B = (13 * 2 + 1),
   RDS_TYPE_14A = (14 * 2 + 0),
   RDS_TYPE_14B = (14 * 2 + 1),
   RDS_TYPE_15A = (15 * 2 + 0),
   RDS_TYPE_15B = (15 * 2 + 1)
}

Not all groups are in use all the time. However, there are some commitments, defined by the protocol. For example, 1A have to be transmitted at least once a second. This group contains special information, required for receivers to be synchronized and locked into the transmitting channel.

Within the error correction information we also receive the direction to treat them.

private enum correctedType : byte {
   NONE = 0,
   ONE_TO_TWO = 1,
   THREE_TO_FIVE = 2,
   UNCORRECTABLE = 3
}

Also, each message type has it own limits. For example RT (Radio Text - 64 character text to display on your receiver) and PS (Programme Service - eight character station identification) message are limited to 2 groups, when PI (Programme Identification - unique code of the station) and PTY (Programme Type - one of 31 predefined program types - e.g. News, Drama, Music) are limited to 4.

In addition to those constraints, block types are also different. But in this case, there are only 4 kinds

private enum blockType : byte {
   A = 6,
   B = 4,
   C = 2,
   D = 0
}

So, what we're waiting for? Let's start working.

Handling errors

First of all we should take care on errors and fix them if possible. For this purpose, we should first count them and detect the way of fixing

var errorCount = (byte)((registers[0xa] & 0x0E00) >> 9);
var errorFlags = (byte)(registers[0x6] & 0xFF);
if (errorCount < 4) {
   _blocksValid += (byte)(4 - errorCount);
} else { /*drop data on more errors*/ return; }

Once it done, we can try to fix them

//Also drop the data if more than two errors were corrected
if (_getErrorsCorrected(errorFlags, blockType.B) > correctedType.ONE_TO_TWO) return;

private correctedType _getErrorsCorrected(byte data, blockType block) { return (correctedType)((data >> (byte)block) & 0x30); }

Now, our registers should be fine and we can start the detection of group type

Group Type Detection

This is very simple task, all we have to do is to get five upper bites to get a type and version.

var group_type = (groupType)(registers[0xD] >> 11);

Then we can handle PI and PTY, which we always have in RDS.

PI and PTY treatment

Now, let's update pi code, due to the fact, that B format always have PI in words A and C

_updatePI(registers[0xC]);

if (((byte)group_type & 0x01) != 0) {
_updatePI(registers[0xE]);
}

To update PI, we should check whether the new value is different from the previous and update it only in case it changed.

private void _updatePI(byte pi) {
   uint rds_pi_validate_count = 0;
   uint rds_pi_nonvalidated = 0;

   // if the pi value is the same for a certain number of times, update a validated pi variable
   if (rds_pi_nonvalidated != pi) {
      rds_pi_nonvalidated = pi;
      rds_pi_validate_count = 1;
   } else {
      rds_pi_validate_count++;
   }

   if (rds_pi_validate_count > PI_VALIDATE_LIMIT) {
      _piDisplay = rds_pi_nonvalidated;
   }
}

Then we will update PTY

_updatePTY((byte)((registers[0xd] >> 5) & 0x1f));

PTY treatment is very similar to PI, however it can be multiplied.

private void _updatePTY(byte pty) {
   uint rds_pty_validate_count = 0;
   uint rds_pty_nonvalidated = 0;

   // if the pty value is the same for a certain number of times, update a validated pty variable
   if (rds_pty_nonvalidated != pty) {
      rds_pty_nonvalidated = pty;
      rds_pty_validate_count = 1;
   } else {
      rds_pty_validate_count++;
   }

   if (rds_pty_validate_count > PTY_VALIDATE_LIMIT) {
      _ptyDisplay = rds_pty_nonvalidated;
   }
}

When we done with those two groups, we can start handling another. Today, we'll handle only 0B, 2A and 2B types (I have a good reason for it, due to the fact, that only those are supported in Israel by now :) ) So,

Handling PS and different RTs

Simple switch on those groups

switch (group_type) {
   case groupType.RDS_TYPE_0B:
      addr = (byte)((registers[0xd] & 0x3) * 2);
      _updatePS((byte)(addr + 0), (byte)(registers[0xf] >> 8));
      _updatePS((byte)(addr + 1), (byte)(registers[0xf] & 0xff));
      break;
   case groupType.RDS_TYPE_2A:
      addr = (byte)((registers[0xd] & 0xf) * 4);
      abflag = (byte)((registers[0xb] & 0x0010) >> 4);
      _updateRT(abflag, 4, addr, (byte[])registers.Skip(0xe), errorFlags);
      break;
   case groupType.RDS_TYPE_2B:
      addr = (byte)((registers[0xd] & 0xf) * 2);
      abflag = (byte)((registers[0xb] & 0x0010) >> 4);
      // The last 32 bytes are unused in this format
      _rtTmp0[32] = 0x0d;
      _rtTmp1[32] = 0x0d;
      _rtCnt[32] = RT_VALIDATE_LIMIT;
      _updateRT(abflag, 2, addr, (byte[])registers.Skip(0xe), errorFlags);
      break;
}

and let's dig into PS.

In PS, we have high and low probability bits. So, if new bit in sequence matches the high probability bite and we have recieved enough bytes to max out the counter, we'll push it into the low probability array.

if (_psTmp0[idx] == default(byte)) {
           if (_psCnt[idx] < PS_VALIDATE_LIMIT) {
               _psCnt[idx]++;
            } else {
               _psCnt[idx] = PS_VALIDATE_LIMIT;
               _psTmp1[idx] = default(byte);
            }
         }

Else, if new byte matches with the low probability byte, we should swap them and then reset the counter, by flagging the text as in transition.

else if (_psTmp1[idx] == default(byte)) {
            if (_psCnt[idx] >= PS_VALIDATE_LIMIT) {
               isTextChange = true;
            }
            _psCnt[idx] = PS_VALIDATE_LIMIT + 1;
            _psTmp1[idx] = _psTmp0[idx];
            _psTmp0[idx] = default(byte);
         }

When we have an empty byte in high probability array or new bytes does not match anything we know, we should put it into low probability array.

else if (_psCnt[idx] == null) {
            _psTmp0[idx] = default(byte);
            _psCnt[idx] = 1;
         } else {
            _psTmp1[idx] = default(byte);
         }

Now, if we marked our text as changed, we should decrement the count for all characters to prevent displaying of partical message, which in still in transition.

         if (isTextChange) {
            for (byte i = 0; i < _psCnt.Length; i++) {
               if (_psCnt[i] > 1) {
                  _psCnt[i]--;
               }
            }
         }

Then by checking PS text for incompetence, when there are characters in high probability array has been seen fewer times, that was limited by validation.

         for (byte i = 0; i < _psCnt.Length; i++) {
            if (_psCnt[i] < PS_VALIDATE_LIMIT) {
               isComplete = false;
               break;
            }
         }

Only if PS text in the high probability array is complete, we'll copy it into display.


         if (isComplete) {
            for (byte i = 0; i < _psDisplay.Length; i++) {
               _psDisplay[i] = _psTmp0[i];
            }
         }

It is not very hard to treat PS. Isn't it? Let's see what's going on with RT.

If A and B message flag changes, we'll try to force a display by increasing the validation count for each byte. Then, we'll wipe any cached text.

   if (abFlag != _rtFlag && _rtFlagValid) {
      // If the A/B message flag changes, try to force a display
      // by increasing the validation count of each byte
      for (i = 0; i < _rtCnt.Length; i++) _rtCnt[addr + i]++;
      _updateRTValue();

      // Wipe out the cached text
      for (i = 0; i < _rtCnt.Length; i++) {
         _rtCnt[i] = 0;
         _rtTmp0[i] = 0;
         _rtTmp1[i] = 0;
      }
   }

Now A and B flags are safe, sp we can start with message processing. First of all, NULL in RDS means space :)


   _rtFlag = abFlag;    
   _rtFlagValid = true;   

   for (i = 0; i < count; i++) {
      if (p[i] == null) p[i] = (byte)' ';

The new byte matches the high probability byte also in this case. We habe to recieve this bite enough to max out counters. Then we can push it into the low probability as well.

      if (_rtTmp0[addr + i] == p[i]) {
         if (_rtCnt[addr + i] < RT_VALIDATE_LIMIT) _rtCnt[addr + i]++;
         else {
            _rtCnt[addr + i] = RT_VALIDATE_LIMIT;
            _rtTmp1[addr + i] = p[i];
         }
      }

When the new byte matches with low probability byte, we'll swap them as well and reset counters to update text in transition flag. However in this case, our counter will go higher, then the validation limit. So we'll have to remove it down later.

else if (_rtTmp1[addr + i] == p[i]) {

         if (_rtCnt[addr + i] >= PS_VALIDATE_LIMIT) isChange = true;

         _rtCnt[addr + i] = RT_VALIDATE_LIMIT + 1;
         _rtTmp1[addr + i] = _rtTmp0[addr + i];
         _rtTmp0[addr + i] = p[i];
      }

Now, the new byte is replaced an empty byte in the high probability array. Also, if this byte does not match anything, we should move it into low probability.

else if (_rtCnt[addr + i] == null) { 
         _rtTmp0[addr + i] = p[i];
         _rtCnt[addr + i] = 1;
      } else _rtTmp1[addr + i] = p[i];

   }

Now when the text is changing, we'll decrement the counter for all characters exactly as we did for PS.


      for (i = 0; i < _rtCnt.Length; i++) {
         if (_rtCnt[i] > 1) _rtCnt[i]--;
      }
   }

However, right after, we'll update display. 

   _updateRTValue();
}

Displaying RT

But how to convert all those byte arrays into readable message? Simple :)

First of all if text is incomplete, we should keep loading it. Also it makes sense to check whether the target array is shorter then maximum allowed to prevent junk from being displayed.

for (i = 0; i < _rtTmp0.Length; i++) {
   if (_rtCnt[i] < RT_VALIDATE_LIMIT) {
      isComplete = false;
      break;
   }
   if (_rtTmp0[i] == 0x0d) {
      break;
   }
}

Now, when our Radio Text is in the high probability and it complete, we should copy buffers.

if (isComplete) {
   _Text = string.Empty;

   for (i = 0; i < _rtDisplay.Length; i += 2) {
      if ((_rtDisplay[i] != 0x0d) && (_rtDisplay[i + 1] != 0x0d)) {
         _rtDisplay[i] = _rtTmp0[i + 1];
         _rtDisplay[i + 1] = _rtTmp0[i];
      } else {
         _rtDisplay[i] = _rtTmp0[i];
         _rtDisplay[i + 1] = _rtTmp0[i + 1];
      }

      if (_rtDisplay[i] != 0x0d)
         _Text += _rtDisplay[i];

      if (_rtDisplay[i + 1] != 0x0d)
         _Text += _rtDisplay[i + 1];

      if ((_rtDisplay[i] == 0x0d) || (_rtDisplay[i + 1] == 0x0d))
         i = (byte)_rtDisplay.Length;
   }

And not forget to wipe out everything after the end of the message :)


   for (i++; i < _rtDisplay.Length; i++) {
      _rtDisplay[i] = 0;
      _rtCnt[i] = 0;
      _rtTmp0[i] = 0;
      _rtTmp1[i] = 0;
   }
}

And finally update the text

Text = _Text;

We done. Now we can handle RDS digital messages, but what to do with analog data we get? Don't you already know? I blogged about it here.

Have a nice day and be good people, because you know how to write client, knows to get and parse radio data in managed code.

image

Friday, November 21, 2008

Creating transparent buttons, panels and other control with Compact Framework and putting one into other

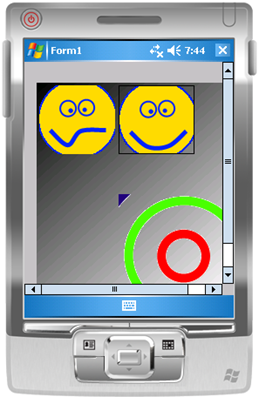
In WPF/Silverlight world it's very simple to make transparent controls and put anything inside anything. However, that's not the situation in WinForms, and even worth in the world of compact devices with CF. Within this worlds, there is only one way to make controls transparent - to use color masks. Today, we'll create transparent controls with Compact Framework and put it into panel, which has image background.

image

So let's start. First of all, we need create our own control. For this purpose, we have to inherit from Control and override couple of things. More precise: OnPaint and OnPaintBackground. We do not want to paint background for transparent control, so let's prevent it.

public class TransparentImageButton : Control

protected override void OnPaintBackground(PaintEventArgs e) {
           //prevent
       }

       protected override void OnPaint(PaintEventArgs e) {

Next, we have to get graphics, delivered by OnPain event argument and draw our image over it. However, BitBlt (which is used by core graphics system) is not very fast method, so it's better for us to draw everything first and then copy final image to the device.

Graphics gxOff;
Rectangle imgRect;
var image = (_isPressed && PressedImage != null) ? PressedImage : Image;

if (_imgOffscreen == null) {
_imgOffscreen = new Bitmap(ClientSize.Width, ClientSize.Height);
}

gxOff = Graphics.FromImage(_imgOffscreen);
gxOff.Clear(this.BackColor);  
...
         

if (image != null) {
var imageLeft = (this.Width - image.Width) / 2;
var imageTop = (this.Height - image.Height) / 2;

if (!_isPressed) imgRect = new Rectangle(imageLeft, imageTop, image.Width, image.Height);
else imgRect = new Rectangle(imageLeft + 1, imageTop + 1, image.Width, image.Height);
var imageAttr = new ImageAttributes();

To make images transparent, we have to use (as mentioned earlier) transparency color key (to tell windows what color it should not draw. We can code or provide this value to detect it by hitting any pixel on the image. Just like this:

public static Color BackgroundImageColor(this Bitmap bmp) {
           return bmp.GetPixel(0, 0);
       }

Now we can keep working.

imageAttr.SetColorKey(image.BackgroundImageColor(), image.BackgroundImageColor());
gxOff.DrawImage(image, imgRect, 0, 0, image.Width, image.Height, GraphicsUnit.Pixel, imageAttr);
} if (_isPressed) {
var rc = this.ClientRectangle;
  rc.Width--;
  rc.Height--;
  gxOff.DrawRectangle(new Pen(Color.Black), rc);
}
e.Graphics.DrawImage(_imgOffscreen, 0, 0);

Also, we have to provide others with possibility to handle this even too, thus we will not forget to add base.OnPaint(e); at  the end.

Next step is to detect whether our button is clicked or not. We'll override keyboard and mouse events to detect this.

protected override void OnKeyDown(KeyEventArgs e) {
            _isPressed = this.Focused; this.Invalidate();
            base.OnKeyDown(e);
        }

        protected override void OnKeyUp(KeyEventArgs e) {
            _isPressed = false; this.Invalidate();
            base.OnKeyUp(e);
        }

        protected override void OnMouseDown(MouseEventArgs e) {
            _isPressed = this.Focused; this.Invalidate();
            base.OnMouseDown(e);
        }

        protected override void OnMouseUp(MouseEventArgs e) {
            _isPressed = false; this.Invalidate();
            base.OnMouseUp(e);
        }

Compile and run to see no problem, when our transparent button lies on solid color control, however, we want to put it into panel with background - just like this one. In this case, you can use real transparent PNG and GIF images, also you can replace transparent color with well known Magenta (or any other color).

public class ImagePanel : Panel {

        public Bitmap Image { get; set; }

        protected override void OnPaintBackground(PaintEventArgs e) {
            e.Graphics.DrawImage(Image, 0, 0);
        }
    }

When we'll put it onto anything, that has no background color, we'll see that our "fake transparency" disappears. Why this happen? To provide transparency Windows uses color masks, also while confederating facts, clipping algorithm within GDI is not very trustful, thus the only thing can be taken into account is color. But what to do if we have an image? We should clip it manually. We cannot just get the handle to parent device surface (see above about trustful GDI), so the only way to do it is by providing something, that we know for sure. For example interface, telling us, that parent has image, which drawn on the screen.

internal interface IHaveImage {
        Bitmap Image { get; set; }
    }

When we know it, all we have to do is to clip the region of this image (not device context) and draw it as part of our really transparent control.

if (this.Parent is IHaveImage) {
                var par = this.Parent as IHaveImage;
                gxOff.DrawImage(par.Image.Clip(this.Bounds), 0, 0);
            }

The implementation of Image.Clip is very straight forward.

public static Bitmap GetSS(this Graphics grx, Rectangle bounds) {
    var res = new Bitmap(bounds.Width, bounds.Height);
    var gxc = Graphics.FromImage(res);
    IntPtr hdc = grx.GetHdc();
    PlatformAPI.BitBlt(gxc.GetHdc(), 0, 0, bounds.Width, bounds.Height, hdc, bounds.Left, bounds.Top, PlatformAPI.SRCCOPY);
    grx.ReleaseHdc(hdc);
    return res;
}

public static Bitmap Clip(this Bitmap source, Rectangle bounds) {
    var grx = Graphics.FromImage(source);
    return grx.GetSS(bounds);
}

We done. Compiling all together will fake transparency for controls, even when it's parents background is not pained with  solid color brush.

Source code for this article

P.S. Do not even try to inherit your custom Button control from framework Button class, dev team "forgot" to expose it's event for override. So, OnPaint, OnPaintBackground, OnKeyUp, OnKeydown, OnMouseUp and OnMouseDown aside with most of other base events will not work for you, also BaseButton class has no default constructor, so the only class you can inherit from is Control.

Have a nice day and be good people.

Wednesday, November 19, 2008

How to P/Invoke VarArgs (variable arguments) in C#? ... or hidden junk in CLR

Recently I wrote a cheat sheet for pinvoking in .NET. Shortly after I got a question in comments about how to deal with variable arguments, when it's more, then one parameter. Also what to do if those arguments are heterogeneous?

Let's say, that we have following method in C:

int VarSum(int nargs, ...){
    va_list argp;
    va_start( argp, nargs );
    int sum = 0;
    for( int i = 0 ; i < nargs; i++ ) {
        int arg = va_arg( argp, int );
        sum += arg;
    }
    va_end( argp );

    return sum;
}

We can expose this method to C# as following:

[System.Runtime.InteropServices.DllImportAttribute("unmanaged.dll", EntryPoint = "VarSum")]
        public static extern int VarSum(int nargs,int arg1);

[System.Runtime.InteropServices.DllImportAttribute("unmanaged.dll", EntryPoint = "VarSum")]
        public static extern int VarSum(int nargs,int arg1,int arg2);

[System.Runtime.InteropServices.DllImportAttribute("unmanaged.dll", EntryPoint = "VarSum")]
        public static extern int VarSum(int nargs,int arg1,int arg2,int arg3);

etc...

And it will work. However, if you'll try to expose it as int array, marshaller will fail to understand how to align things

[System.Runtime.InteropServices.DllImportAttribute("unmanaged.dll", EntryPoint = "VarSum")]
        public static extern int VarSum(int nargs,int[] arg);

This in spite of the fact, that this method will work properly with another signature

int ArrSum(int* nargs) {
    int sum = 0;
    for( int i = 0 ; i < 2; i++ ) {
        sum += nargs[i];
    }
    return sum;
}

So what to do? The official answer is - you have nothing to do, rather then override all possibilities. This is very bad and absolutely not flexible. So, there is small class in C#, named ArgIterator. This one is similar to params object[], but knows to marshal into varargs. The problem is, that you have no way to add things inside. It's "kind-of-read-only".

Let's look into reflected version of ArgIterator. We'll see there something, named __arglist and __refvalue. OMG, isn't it good old stuff similar to "__declspec(dllexport) int _stdcall" etc.? It is! But can we use it in C#? We can! Just sign your method as Cdecl and you have working signature for "..."

[System.Runtime.InteropServices.DllImportAttribute("unmanaged.dll", EntryPoint = "VarSum",
            CallingConvention=System.Runtime.InteropServices.CallingConvention.Cdecl)]
        public static extern int VarSum(int nargs, __arglist);

Yes, looks strange, and absolutely not CLR compliant. However, this is the only way to expose varargs to CLR via P/Invoke. How to use it? Simple:

c = VarSum(2, __arglist(5, 10));

Have a nice day and be good people. Also, my question to Microsoft is why this stuff is not in MSDN and we, as developers, have no way to get rid of it.

Is not it very good practices to use non-compliant methods? Give us another way to do it!
Is not it very good practices to use variable arguments in unmanaged method signatures? So why you want dynamic types in C# 4?

Source code for this article

Sunday, November 09, 2008

Programming for Windows 7

Well, Windows 7 is going to be released by the end of next year. This is great news, because it seemed, that Microsoft finally understand how to get the best of Windows Vista and make it to work not only on monster machines.

image

It even works on new brandy my wife's pinky machine. And if it works there and my wife is happy with it, this OS going to be very impressive.

image

But from the other hand, we, as developers should be ready today to developer Windows 7 ready application (by the way, Vista Battery Saver works for Windows 7 as well as for Windows Vista, in spite of the fact, that power management in Windows 7 was improved dramatically). So let's start!

First thing we need is to read big Windows 7 Developer Guide. This document will explain most of new features for developers to build applications right. What is includes?

Windows Driver Kit (WDK) 3.0

Basically, Windows 7 works with Vista drivers, however, hibernation, power management, networking, PREfast will work much better. You also will have new WMI access for reliability monitors and ACPI.

Management and deployment

By default Windows 7 uses PowerShell 2.0 and Windows Installer. For PowerShell it includes enhanced cmdlets to manage Active Directory, IIS, etc. For Windows Installer, you finally can build "chainers" by yourself (the same approach, used for latest deployment of Microsoft products such as Silverlight, Visual Studio 2008 SP1 etc.) Also, you can get advantage by using Windows Filtering Platform (Firewall) and User Account Control (UAC) from inside your application by using new APIs.

Performance

The most significant change in Windows 7 for end-user point of view is improved performance. Windows 7 kernel is much smaller, that kernel of Windows Vista. Also it uses specific patterns to decrease background activities on low power, based on system triggers. New user-mode and kernel-mode APIs are used by Windows Drivers Foundation much more efficiently. Also system services are much smarter. For example, DCIA starts only when you connect new hardware. After drivers were installed the service shuts down. The same approach used by domain join, GP changes, new IP fetching etc. Windows 7 knows to run and stop services, based on system events, which decreases average work load and enhances whole system performance.

Multi-touch gestures and Interia API and used interface in general

Yes, you can use this API for your applications. Finally we can have more, then just mouse. And it is not only about multiple mouse devices. We can use single finder panning, raw touch input data, internal multitouch ink recognition, which is also supports math. Also it uses build-in MathML export feature.

There are a lot of other enhancements, such as smart bars, windows' stacking, gadget desktop (it does not eat battery as external process anymore), system ribbon menu integration. etc

Graphics

Direct 11, new Direct2D, DirectWrite (we can turn text anti-aliasing for small fonts, hurrah!), improved WIC, DX/GDI interoperability on system level with automatic fallback for weak hardware (yes, you should not be worry about it anymore). Also new video and audio format support with human readable interfaces. Yes, no more DirectDraw hacks. We can use new high level interfaces such as MFPlay to manage playbacks, Source Reader for decoding, Sink Writer for transcoders and re-coding compressions.

Web and communication

WCF is inside, as well as distributed routing table for peer-to-peer operations. BranchCache - new technology to reduce WAN traffic and latency.

Also Windows 7 is compatible with OpenSearch (I told, that Microsoft does not know to build search engines). Sharepoint integration and environment sensors platform, that can be used either for desktop and web applications.

There are much more features, that makes Windows 7 to pretend to be very good operation system. If you want to learn more about all those Windows 7 new features, I highly advice you to download and read this document. It includes most of new features of new OS with explanations and screenshots to make your learn and understand what can your future application do with all those new features.

Have a nice day and be good people.

BTW, if you have PDC version of Windows 7 and want to unlock it for using of some cool features, introduced during keynotes, it worth to visit here and learn how to :)

Download Windows 7 Developer Guide and start programming.

Saturday, October 11, 2008

Issues, you reported were fixed

Hi, folks. And thank you for reporting issues with WpfPerf Performance Profiling tool. Now it was fixed, so, download and use new and fixed version.

Keep reporting, as you can see, you have the power to change!

image

Imaginary by Malcolm Dare

Sunday, October 05, 2008

Silverlight Bidi Controls Library RC0 and movement from Beta 2 to RC0

Finally, I got free minute to convert Silverlight BiDi controls from Silverlight beta 2 to RC0 (you can download SL rc0 tools for VS2008 here) and as usual some breaking changes (the full list is here)

  • Calendar and DatePicker moved from System.Windows.Controls.Extended into System.Windows.Controls – Extended namespace is now deprecated.
  • CalendarButton is not inside System.Windows.Controls.Primitives
  • TypeConverter.CanConvertFrom(Type sourceType) was changed and now it has new first parameter ITypeDescriptorContext context
  • TypeConverter.CanConvertFrom(object value) was changed and now it has new first parameter ITypeDescriptorContext context and second parameter System.Globalization.CultureInfo culture
  • TypeConverter.ConvertFromString is not virtual anymore
  • TextDecorationCollectionConverter was removed
  • generic.xaml should be placed into themes directory (as in WPF)
  • VisualTransition.Duration is not VisualTransition.GeneratedDuration
  • ContentPresenter has no HorizontalContentAlignment and VerticalContentAlignment. It has HorizontalAlignment and VerticalAlignment now. Also it has no Background, Padding,TextAlignment,TextDecorations and TextWrapping properties

Those, basically, all changes done in Silverlight RTL support library. So, you can download and use the latest version within Silverlight RC0 version

Have a nice day and be good people.

Saturday, October 04, 2008

Free Microsoft Expression series video training catalogs

MSDN download center just published video catalogs, where you can find sample chapters of Total Training’s video series for Microsoft Expression studio. Worth to download and see. Here the breakdown by products

Also, if you are “in” Office development, it makes sense to take a look in to Data Connectivity Components for Office 2007 System. It can be used by non-Microsoft Office applications to read data from Office system files.

Happy downloading!

Monday, September 29, 2008

For all those, who have problems with running WPF Performance Profiling tool – Microsoft cares

Three days ago, I announced the new release of WPF Performance Profiling Tool. A couple hours after this was announced, I got a number of comments from you, readers. It was about issues with running this tool. I checked the issue and forwarded it to development team from Microsoft. The problem was in bad parsing of comma and point characters in this tool, when using it on non-US locale. Dev team took care about it and hopefully they will provide a fix soon.

Thank you for reading my blog, reporting and your awareness of such issues. This is very important to me and I’m really appreciate your efforts to help us to develop WPF community.

I’ll update you as soon as the patch will be available.

Thank you and Shana Tova!

image

Friday, September 26, 2008

The new version of WPF Performance Profiling Tool is available for download

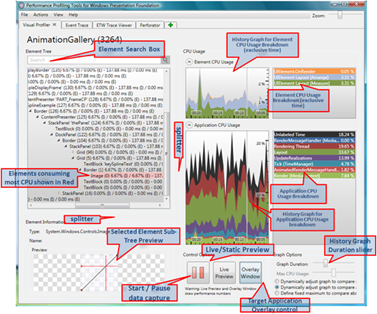
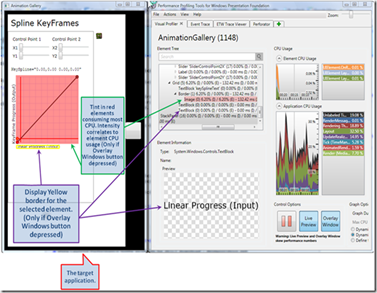
Finally, after a long time of silence, the new version of WPF Performance Profiling Tool is available for download for x32 and x64 OSs.  So, what’s new there?

Ton of UI improvements for Visual Profiler

image

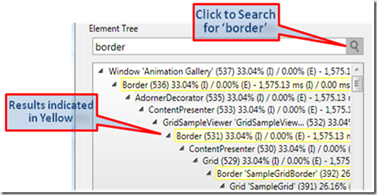
New search function to quick find elements in visual tree

image

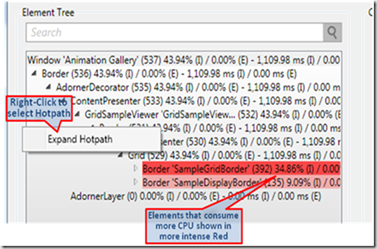
Hot path (critical path) of CPU usage aside with CPU usage for single element

image

Configuration of tint for overlay windows

image

Live preview, ability to split columns, slider of graph duration, expanders to have cleaner screen and much much more

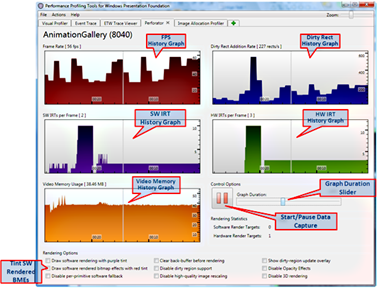
Perforator also got new UI and has history now.

image

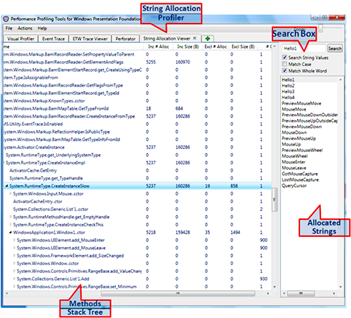
There is new tool, named String allocation profiler

image

This tool is very useful for viewing and managing strings inside your application (another step toward normal localization support for WPF? Probably)

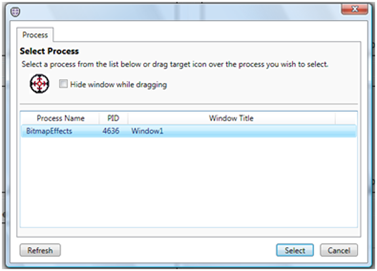
There are also some improvements in Event tracing tool. Select process for example :)

image

And much much more. Great thank to Josef and his team for this great work

Download the new version of WPF Performance Profiling Tool >>

Monday, September 22, 2008

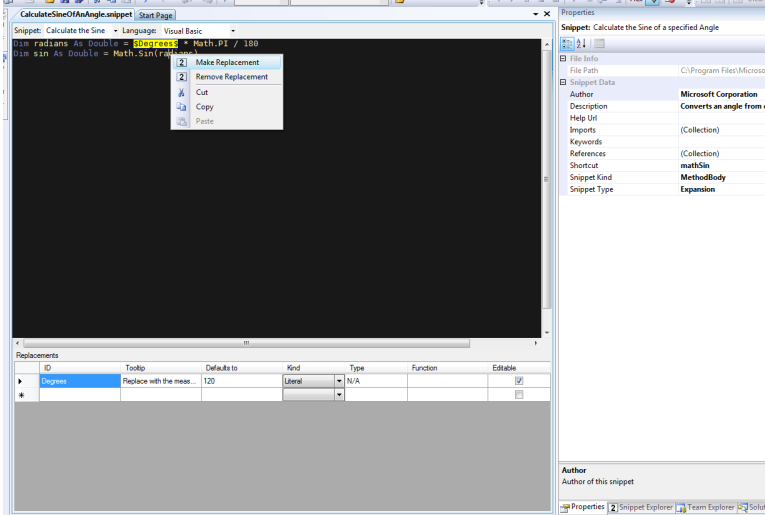
Visual Studio snippet designer

Chicks love CodePlex as well as Microsoft loves it too and today they release extremely useful tool, that was internal for more, then three years. It named: “Visual Studio Snippet Designer”.

image

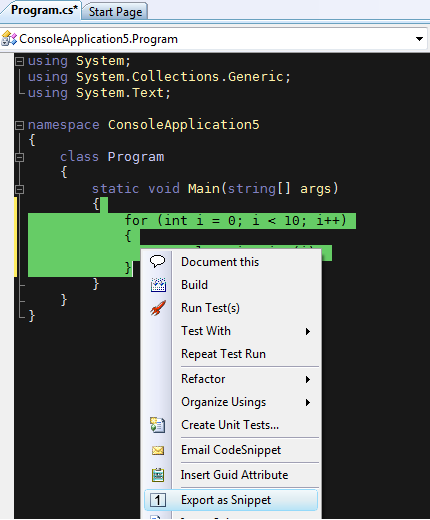
As you can, probably, understand. This tools is used to create and manage VS time savers - snippet files (introduced in VS2005)

image

This is great tool, that will help you a lot to save your time during regular everyday development. Any other word is unnecessary. Download, install and use it!

Friday, August 22, 2008

Vista batter saver got Danish locale! + RC2 branch

Great thank (how will it be in Danish?) to Bjarke Istrup Pedersen for Danish translation of Vista Batter Saver.

Download public beta 2 r2 with Danish locale >>

If you would like to take a challenge and test new RC2, you can do it also (no locale yet). It includes additional functionality and dozen bugs fixes.

Download latest RC1 >>

Tuesday, August 12, 2008

WPF DataGrid CTP is here. It’s also open source!

Huge amount of people asked me about DataGrid control in WPF. There are some 3rd parties providing this control for free and not, However, I always adviced them to wait until Microsoft will release it with (or after) Arrowhead. So here comes the King. Some boys and girls from MS WPF dev team have OS initiative and released WPF toolkit. It’s absolutely free and includes all sources. Also it renewed with WPF DataGrid CTP and other tasty Futures inside with full source aside.

Microsoft goes open source? It does!

image

Download latest WPF toolkit >>

Friday, August 08, 2008

Expert days – last minute changes

Next week we’ll starting Expert Days, so you have a last chance to register for Windows Presentation Foundation for fellow developers (12-Aug) and Mastering Microsoft Silverlight 2.0 (13-Aug). Those sessions will take place in Bein-Thumi Herzeliya and start in 8:30.

We have not enough participants to open Advanced .NET 3.5 SP1 (14-Aug) [not enough people know WPF so far in Israel?], thus I would like to propose another kind of session – something like we used to do in Dev Days. You’ll come with your WPF applications, prepare to ask questions about problems with those apps and we’ll solve it together during the day. I will not have slides for this session – it will be live QnA+Discussions meeting. This specific session will take place in Megamot college in Petah-Tikva (not in Bein-Thumi, like all others). What do you think?

Last notice, if we will not have at least 26 attendees (currently for this session we have only 10), neither Advanced .NET 3.5 nor WPF QnA will be opened. Also, all people registered for those sessions will be refunded. So, now you will choose whether and which session about WPF we will open Thursday next week.

Thursday, July 24, 2008

Configuring and running Mono ASP.NET 3.5 (AJAX.NET) on Linux computers

Before we will start, we should install Linux. To do this, you can download any of LiveCDs with live installation. Officially, Mono supported only on one free Linux - openSuse. However, you can make it work on any RedHat (and its alternatives), OpenSolaris. It works, but unsupported on Debians, Ubuntu and Maemo. We’ll stick to openSuse by now.

image

Let’s install it - OS

I’m assuming, that you’re installing Linux as the only OS on the machine, so insert liveCD (it can be either Gnome or KDE) and wait for Linux to run. It will run live image directly on your machine without installation.

When it’ll up, you’ll see liveInstall icon in your desktop. Click it and skip first two screens (it is only language and local settings). Next screen (disk partitions) is necessary for us.

On this screen, first delete all automatic partitions. The only one main partition will remain (/DEV/SDA or /DEV/HDA). Next you should choose non-LVM option and then start creating partitions.

Create first partition with mount point /boot and size of 100Mb. File system for this partition should be ext3.

Create second partition with file system SWAP (you will not have mount point) and set the size twice bigger, then RAM amount.

Create last partition with mount point / and all remaining size on disk.

All other steps are optional, you can just click Next button.

After about 10 minutes you’ll have up and running openSuse system. (If you forgot to remove CD, choose HardDisk as boot option)

Web Server installation

Now we have to install web server. You can choose either Apache, FastCGI  or use build-in server within Mono – XSP. We’ll choose Apache

Goto “Computer” it’s in the same place as Start button :) and choose YaST. You’ll be asked for admin password, you entered while installing the system.

Now in the Filter field, type “Install”. Choose “Software Management” from the available programs at right. Now, when Package Selection dialog opens, type “apache”, you’ll find apache2. Select it and click Install. Apache will move to the right column. Optionally, you can install also prefork and utils packages.

Now hit “Apply” to install it. Within two minutes, you’ll be asked to log off and log on. Do it.

By now apache is not running, you should run it and set it starts automatically. To do this, enter terminal window (you can either do it from “Computer” menu or right clicking desktop).

You need elevation to administrate startup programs. So type: “su –“ and enter your password. Terminal color turns red. Type “chkconfig apache2 on”. Now you should check whether it done, so type: “chkconfig apache2 –list”. You should see “On” near number 3 and 5.

To run apache manually, just type “/etc/init.d/apache2 start” to stop “/etc/init.d/apache2 stop”, to restart “/etc/init.d/apache2 restart” and to check the status “/etc/init.d/apache2 status

We done, apache is up and running. Now we should install mono

Mono installation

Start with the same YaST but this time, type “mono” – you’'ll get a lot of programs. To simplified installation, choose (or type) mono-complete. This will all available Mono modules.

After Mono will be installed, you should install also apache2-mod_mono to make possible running ASP.NET mono pages in Apache. do this.

Log off – log on and move to configuration

Mono configuration

Now it’s time to configure what ASP.NET pages you want to run. We want ASP.NET 2.0, so we should run mono apache mode for this version. To do this, go to the terminal, elevate yourself (su –) and type following: “vi /etc/apache2/httpd.conf” This will open VI editor with apache configuration file in it.

Now it’s time to learn VI a little. To start editing, you should type “A” – it will write “INSERT” in the lower left corner. To return to the command mode, hit escape key. To save (from command mode) “:w” to exit and save:wq” to exit without save:q!”. To find/” and string the pattern you are looking for.

Now go the the very end of the file  and write under Include “/etc/apache2/vhosts.d/*.conf” following:
(to short string “[D]” is your virtual directory (slash blank is root), “[P]” is physical path to your site without trailing slash)

MonoServerPath default /usr/bin/mod-mono_server2
Alias [D] “[P]”
AddMonoApplications default “[D]:[P]”
<Location [D]>
SetHandler mono
</Location>

So, if your site is MySite and it is in /srv/www/htdocs/MySite, this section will looks as following:

MonoServerPath default /usr/bin/mod-mono_server2
Alias /MySite “/srv/www/htdocs/MySite”
AddMonoApplications default “/MySite:/srv/www/htdocs/MySite”
<Location /MySite>
SetHandler mono
</Location>

If you want to turn it to the root site, this will looks following:

MonoServerPath default /usr/bin/mod-mono_server2
AddMonoApplications default “/:/srv/www/htdocs/MySite”
<Location />
SetHandler mono
</Location>

Now, we’ll add mono administrative site to be able to restart mono only without touching apache itself. To do this, after last </Location> you should add following:

<Location /mono>
SetHandler mono-ctrl
Order deny,allow
Deny from all
Allow from 127.0.0.1
</Location>

I think it’s very clear what it did :)

If you have more, then one site and want to configure mono differently for each one of those, you should add VirtualHost section. To do this, include your configuration in to

<VirtualHost [IP and port you want, for example 1.1.1.1:80 or *:80 for all IPs on port 80]>
ServerName [Name you want]

</VirtualHost>

We done. Restart apache and enter the url you set (for example http://localhost/MySite/)

Working? Good. You finished.

Not working (familiar yellow error 500 screen)? Keep reading…

Debugging Mono website

Do you remember, that you have no development environment in this machine? You can install it, or download Mono liveCD with openSuse. But before doing it, please note, that GTK# (it’s devenv) is not very user friendly. It even worse, then Eclipse. So let’s try to understand first whether we can fix small compatibility problems without entering code.

The most convenient method to debug web site on Mono is by using XSP and XSP2 mini web servers. Just enter the directory of the site and run it. By default you’ll be able to access the site by using “http://localhost:8080” (it also be written for you). Enter and notice whether you have any errors in console. No? Keep doing

The most common problem is “error 500” with nonsense stack. If it contains ScriptManager error Type not found, the problem is in Web.config file. Try to regenerate it to be compatible to Mono (for example, Mono has different version of System.Web.Extensions assembly. In ASP.NET 3.5 it has version 3.5, Mono has only 1.0.61025.0 (the old AJAX.NET). To recreate your web.config all you have to do is to execute “mconfig af AJAX Web.config” It will create default web.config file, supports System.Web.Extensions (AJAX features).

Not helped? Keep doing. Let’s look another time into the stack – if it contains errors in “EnablePageMethods” or “ShouldGenerateScript” or “EncryptString” – the problem is serialization. Mono has very limited support for JSON, XML and SOAP serialization. Try to look into your code and notice if you have classes, marked with [Serializable] or you are transferring your own classes by using PageMethods. If so, replace it with regular strings (my grandma serialization).

Person p = new Person();
string sstr = string.Format(“{0}|{1}|{2}|{3}”, p.FirstName, p.LastName, p.Age, p.Wage);
return sstr;

var sstr = persons[i].split("|");
var p.FirstName =  sstr[0];
var p.LastName =  sstr[1];
var p.Age =  sstr[2];
var p.Wage =  sstr[3];

Not helped? Try to rename “Bin” directory into “bin” “mv Bin bin –r”. Actually this was fixed in latest versions of Mono, but who knows?…

No? Check whether you have partial classes, which is not supported by Mono. If so, recompile it like this

mcs /t:library /out:bin/test.dll –r:System.Web –r:System.Data –r:System.Web.Services –r:System.Web.UI.Controls test.aspx.cs

If you have Generics in your code, you should use gmcs, rather then mcs.

Not helped? It looks, that you have to either install Mono on your Windows machine and debug your code with it. Or, alternatively install GTK# and do in on Linux.

But wait, before doing such big step, install and check the binary compatibility of your code. To do this, you need “Moma” – a simple tool, that tell you if everything is ok for Mono in your assemblies.

Good luck and see you in my forthcoming TechEd session, where I’m presenting openSuse, running UDP multicast server with ASP.NET 3.5 extended methods (It uses recompiled ISAPI filters for apache, rather then regular limited AJAX support in Mono)

Have a nice day and be good people.

Thursday, July 17, 2008

Arabic and Hebrew languages bidirectional support for Silverlight 2.0 beta 2

Those days, I’m, together with guys from Microsoft Egypt and Santeon, finishing development of bidirectional input and output support for Silverlight. I want you to take part in alpha testing of this solution. Please see the test form here and try it.

Also, you can download latest development build and try it yourself. Please, if you’re in any issue, report it, by using issue tracker in CodePlex.

In order to use it, all you have to do is to use custom namespace within your project and then, you’ll be able to get almost all controls, you know, but with Arabic and Hebrew RTL and LTR support. You have to set one property: FlowDirection to change the rendering method (exactly as in WPF). Here an example of usage.

<UserControl x:Class="BidiTest2.Page"
    xmlns="http://schemas.microsoft.com/winfx/2006/xaml/presentation"
    xmlns:x="http://schemas.microsoft.com/winfx/2006/xaml"
    xmlns:l="clr-namespace:System.Windows.BidiControls;assembly=BidiControls">

<l:TextBlock FlowDirection="LeftToRight" Text="שלום עולם"/>

<l:TextBox FlowDirection="RightToLeft" Text="{Binding Text, Mode=TwoWay}"/>

That’s all. Thank you for your cooperation.

image

Tuesday, July 08, 2008

How to handle thickness

Yesterday, we spoke about type converters. We even, built simple generic enum converter. Today, we’ll create more complicated converter, that very missing in Silverlight – ThicknessConverter. During the post, I also explain about tokenizing values in Silverlight

image

What is Thickness ?

What is thickness in Silverlight? It’s

<Border BorderThickness=”6”/>

or

<Border BorderThickness=”6,4,3,2”/> or <Border BorderThickness=”6, 4, 3,2”/> or, even <Border BorderThickness=”6; 4; 3 ;2”/>

How to handle it?

Tokenizing strings

What you seen here is tokenized strings. We have to split them by known token (one and own for each string) and then we can parse it for converter. How to do this? Complicated – too much cases. But, basically, you have to get string, quote character and separator. Don’t forget to check for empty spaces

private void Initialize(string str, char quoteChar, char separator)
        {
            this._str = str;
            this._strLen = (str == null) ? 0 : str.Length;
            this._currentTokenIndex = -1;
            this._quoteChar = quoteChar;
            this._argSeparator = separator;
            while (this._charIndex < this._strLen)
            {
                if (!char.IsWhiteSpace(this._str, this._charIndex))
                {
                    return;
                }
                this._charIndex++;
            }
        }

Then we have to scan string to find tokens

private void ScanToNextToken(char separator)
        {
            if (this._charIndex < this._strLen)
            {
                char c = this._str[this._charIndex];
                if ((c != separator) && !char.IsWhiteSpace(c))
                {
                    Exceptions.ThrowInvalidOperationException("No Separator Found");
                }
                int i = 0;
                while (this._charIndex < this._strLen)
                {
                    c = this._str[this._charIndex];
                    if (c == separator)
                    {
                        this._foundSeparator = true;
                        i++;
                        this._charIndex++;
                        if (i > 1)
                        {
                            Exceptions.ThrowInvalidOperationException("Empty Token Found");
                        }
                    }
                    else
                    {
                        if (!char.IsWhiteSpace(c))
                        {
                            break;
                        }
                        this._charIndex++;
                    }
                }
                if ((i > 0) && (this._charIndex >= this._strLen))
                {
                    Exceptions.ThrowInvalidOperationException("Emply Token Found");
                }
            }
        }

why not just split? Because it is not generic solution for strings with empty tokens, which is absolutely invalid. Another reason of using such helper is performance. String operation are not very fast things, thus we’ll check only the number of tokens required for future operations.

Also, we should make sure, that all tokens are required and get rid of unnecessary parts of the string, such as leading spaces, control characters etc. Now, when we have tokenized string, we can start building converter

Building thickness converter

Actually, the most significant part of this converter is tokenization , thus the most important override method for such converter is ConvertFromString

public override object ConvertFromString(string text)
        {
            Thickness res = new Thickness();
            TokenizerHelper helper = new TokenizerHelper(text);
            double[] numArray = new double[4];
            int index = 0;
            while (helper.NextToken())
            {
                if (index >= 4)
                {
                    index = 5;
                    break;
                }
                LengthConverter lc = new LengthConverter();
                numArray[index] = (double)lc.ConvertFromString(helper.GetCurrentToken());
                index++;
            }
            switch (index)
            {
                case 1:
                    res = new Thickness(numArray[0]); break;
                case 2:
                    res = new Thickness(numArray[0], numArray[1], numArray[0], numArray[1]); break;

                case 4:
                    res = new Thickness(numArray[0], numArray[1], numArray[2], numArray[3]); break;
                default:
                    typeof(Thickness).ThrowConvertFromException(text); break;
            }
            return res;
        }

The only thing to remember is to check whither we can convert from the type received from XAML

public override bool CanConvertFrom(Type sourceType)
        {
            switch (Type.GetTypeCode(sourceType))
            {
                case TypeCode.Int16:
                case TypeCode.UInt16:
                case TypeCode.Int32:
                case TypeCode.UInt32:
                case TypeCode.Int64:
                case TypeCode.UInt64:
                case TypeCode.Single:
                case TypeCode.Double:
                case TypeCode.Decimal:
                case TypeCode.String:
                    return true;
            }
            return false;
        }

Have a nice day and be good people. Stay tuned for future work process items.

Monday, July 07, 2008

Work process: How to use and build type converters

Today, I want to start new tag - “Work process”. Here I’m going to publish partial classes, fixes, small utilities, I’m building for myself or clients to help in work process. I’ll give an example: currently, I’m working on BiDi support for Silverlight 2.0 (beta 2 to RTM). During the work process, I need to write different classes, such as converters, string utilities, exception helpers etc.

ZK4Y7556 
© Imaginary copyright by  Noel Hendrickson

So, today I’ll public general type converter for generic classes.

What is type converter?

TypeConverter is a service attribute, used to help rendering engine to convert XAML string (usually it strings) to the type, you require in your class implementation. Here an example:

In your custom class you have dependency property of type TextAlignment

public TextAlignment TextAlignment
       {
           get { return (TextAlignment)GetValue(TextAlignmentProperty); }
           set { SetValue(TextAlignmentProperty, value); }
       }

In XAML code it will be used as:

<MyControl TextAlignment=”Left”/>

But, what you’re actually transfer to your class is string “Left”, when you need enum TextAlignment.Left, how to convert it? This for we’re using type converters

Attribute usage

In order to “tell” framework to use your type converter, you should mark target property with special attribute TypeConverterAttribute. Also, you can provide default value to your property by using another attribute DefaultValueAttribute. This will looks as following:

[TypeConverter(typeof(MyTextAlignmentTypeConverter))]
[DefaultValue(TextAlignment.Left)]
public TextAlignment TextAlignment
{
  get { return (TextAlignment)GetValue(TextAlignmentProperty); }
  set { SetValue(TextAlignmentProperty, value); }
}

How to build type converter

In order to build type converter, all you have to do is to build your own class, derived from TypeConverter. It also can be generic class. Then, implement necessary methods, that incorporate your business logic. Like this one, converter any enum value back and forward for TypeConverterAttribute

public class EnumValueConverter<T> : TypeConverter where T:struct
    {
        static EnumValueConverter()
        {
            if (!typeof(T).IsEnum) { Exceptions.ThrowInvalidOperationException("Cannot use this type for conversion"); }
        }

        public override bool CanConvertFrom(Type sourceType)
        {
            return Type.GetTypeCode(sourceType) == TypeCode.String;
        }

        public override object ConvertFrom(object value)
        {
            if (value == null)
            {
                typeof(T).ThrowConvertFromException(value);
            }
            if (value is string)
            {
                return ConvertFromString(value as string);
            }
            return (T)value;
        }

        public override object ConvertFromString(string text)
        {
            return (T)Enum.Parse(typeof(T), text, true);
        }

        public override string ConvertToString(object value)
        {
            return Enum.GetName(typeof(T), value);
        }
    }

Final result

Now, when we built converter and know how to use it, we can easily set it to any DependencyProperty requires conversion from / to enum

[TypeConverter(typeof(EnumValueConverter<LineStackingStrategy>))]
public LineStackingStrategy LineStackingStrategy
{
  get { return (LineStackingStrategy)GetValue(LineStackingStrategyProperty); }
  set { SetValue(LineStackingStrategyProperty, value); }
}

[TypeConverter(typeof(EnumValueConverter<TextAlignment>))]
[DefaultValue(TextAlignment.Right)]
public TextAlignment TextAlignment
  {
   get { return (TextAlignment)GetValue(TextAlignmentProperty); }
   set { SetValue(TextAlignmentProperty, value); }
  }

[TypeConverter(typeof(EnumValueConverter<TextWrapping>))]
public TextWrapping TextWrapping
{
  get { return (TextWrapping)GetValue(TextWrappingProperty); }
  set { SetValue(TextWrappingProperty, value); }
}

We done, have a nice day and be good people.

Stay tuned for release of BiDi support for Silverlight 2.0, sponsored by Development Platform Evangelism unit of Microsoft Israel

Monday, June 30, 2008

Printouts of the slides, presented on Silverlight 2.0 open house today

Thank you all, who participated today in Silverlight 2.0 for building Rich Internet Applications event. I uploaded printouts of the slides, presented during the session here. So, you can download it for reference.

I’m really interesting within your feedback (leave comments) in order for me to be able to enhance it for future events.

Also, I want to remind you, that due to lack of space we were unable to handle all those who want to attend, thus we decided to make another session within two weeks, so can register here. Remember, only registered attendees, who with confirmation received will allow to enter. So, hurry up.

If you want to learn more about Silverlight, you can register to attend Expert Days “Mastering Microsoft Silverlight 2.0 – 020 full day course, 13-August, were we’ll have Silverlight 2.0 deep dive training day. You can also review another two courses, I’ll have there:

Download slides from today session >>

Register to attend next event at 23 July >>

image

Thank you and leave a comment…

Sunday, June 29, 2008

Silverlight 2.0 for building Rich Internet Applications (Local Event) – Take 2

As promised earlier, the next session of Silverlight 2.0 for building Rich Internet Applications will take place at 23 July, 8:30 AM-12:30 PM in ILDC. This is exactly the same session for those, who unable to attend tomorrow due to lack of place.

Please, this time, try to register as soon as possible to assure seat assignment.

Register to attend Silverlight 2.0 for building RIA >>

Thursday, June 26, 2008

Please do not ask me. We cannot handle more…

Monday next week, I’ll making half day session about building rich internet applications with Silverlight 2.0 in ILDC. The registration is over a while ago, but during this week, I got very large amount of email, IMs and phones calls with appeal to attend.

Sorry, we’re fully booked (currently about twice of available seats) and cannot handle any more. Only those who registered and got confirmations will allow to enter. It is for your own convenience!

I promise, that within next two weeks I’ll make the same session again for all those, who want to come, but unable to register and attend (after a small arrangement, I’ll publish here next date).

Thank you again for understanding and see you soon.