Tuesday, May 20, 2008

What’s new in MSDN Downloads?

Just look how many new releases those days in MSDN Download web site.

Too much – too cool. Turn your download managers on

image

Have a nice day

Friday, May 16, 2008

Gas Price Windows Vista SideBar gadget – new version is available for download

This post is dedicated to some people in Microsoft and it’s subsidiaries. It begun about year ago, when I developed Gas Price information gadget (do not download it there). Before I started, I sent some personal email to those in MSN, who maintains it’s Auto section. I wait two days and got no response, so wrote this post about HTML scrapping and then I finished the gadget, that uses this technology.

image
© Christopher Robbins

Couple of weeks later, Senior Channel Manager of MSN Marketplace replayed to me. He asked whether I want to convert this gadget to “legal” one by gifting all rights to Microsoft. I asked about my benefits of doing it (my time costs money) and the conversation ended – he even did not responded. I was waiting for “YES” or “NO”, but got only silent.

Year after he mailed me again with warning, that they going to “protect” Auto section in order to prevent unauthorized content grabbing. He asked again about possibility to “legalize” the gadget – I told, that they can do with this gadget whatever they want, so handed it off to MSN team. Nothing happened. No one took care on this.

A month later, I asked again by proposing to allow Windows Vista SideBar referrer too aside with affiliate sites for MSN Auto images, thus the gadget can continue to work and MSN remains protected from other “grabbers”. But he demand to completely remove any reference to MSN from the gadget. The same time I got some proposals of using another data for this very popular gadget and populize other resources instead of very unpopular crappy MSN.

I decided to build new version of the gadget (here you can download) and did it today (my spare time – not work [this is for my manager]). This version even better, then previous one. It contains more information, that updates more frequently. I also includes distance from station and gas stations in Canada. So, this how it looks today

image

As you can see this one is much better and uses Automotive.com information. So what I have to do? Submit it instead of old one, right? This the response, I got from automatic system upon submission.

Your item appears to be either missing a valid signature or a valid certificate. You may also want to check the signature to make sure that it includes the date

Just to make things clear, I signed the code with private signature. They want me to sign it with Trusted Authority. This is very smart request, however I do not want to pay $200-$400 to make their sidebar better! There is neither ROI, nor benefit for me to pay money for something, I’m giving for free to anyone.

Just in case, signing code with certificate, trusted by authority even do not removes regular live gallery end-user warning.

Unverified submission.

Only install applications from developers you trust. This is a third-party application, and it could access your computer's files, show you objectionable content, or change its behavior at any time.

So why me to pay? Only because I want to be nice to Microsoft and replace my old gadget by new one to serve dozen thousands of people, who using Windows Vista with SideBar and my gadget?

NO WAY! I will not submit it there. I will never contribute anything for free to Windows Vista Live Gallery. They want me (and million of other developers) to submit it to Google or Yahoo? I’ll do it! I’ll force my customers to use 3rd party addons and visit 3rd party websites to get the information they want to get without paying anyone. At least their marketing guys know how to make developer not to suffer from his own good wish.

Thank you and good buy! You want to win web? You just impossible to do it.

Download Gas Price gadget for Windows Vista SideBar >> (it signed with personal certificate, so do it for your own risk :) )

P.S. Next week, I have a meeting with Steve Ballmer and I’m going to ask him all those questions. If you have any questions and want me to ask him, please send it to me or leave a comment.

Tuesday, May 13, 2008

How to AddRange/RemoveRange in Silverlight ObservableCollection<T>?

Someone in Silverlight forum asked for interesting question: “Is there any way that I can add/remove items in bulk from an ObservableCollection object?”. The “formal” answer is: “No, AddRange RemoveRange operators are supported for List<T> only collections, thus each time you want to add or remove items from ObservableCollection, you should iterate through all items, thus CollectionChanged event will be fired each time you add or remove anything”. By the way, we have the same problem with WPF ObservableCollection<T>

Is there way to fix it? Yes, it is. However, not sure, that it is very efficient method.

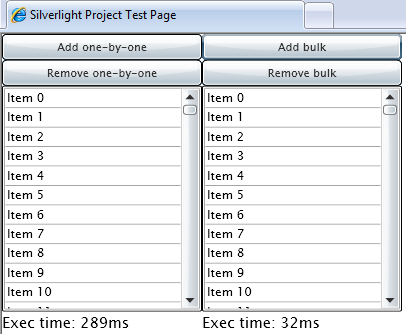
image

We can subclass ObservableCollection and defer OnCollectionChanged method from firing Collectionchanged event for each add or remove items. Here how to do it

First of all create our own class, that inherits ObservableCollection<T>

public class BulkObservableCollection<T>:ObservableCollection<T>
    {

then create two methods and one member for bulk update. At the end of the update we should "tell” our collection, that it dramatically changed, thus we’ll class OnCollectionChanged with NotifyCollectionChangedAction.Reset argument.

bool deferNotification = false;
        public void AddRange(IEnumerable<T> collection)
        {
            deferNotification = true;
            foreach (T itm in collection)
            {
                this.Add(itm);
            }
            deferNotification = false;
            OnCollectionChanged(new System.Collections.Specialized.NotifyCollectionChangedEventArgs(System.Collections.Specialized.NotifyCollectionChangedAction.Reset));
        }

        public void RemoveRange(IEnumerable<T> collection)
        {
            deferNotification = true;
            foreach (T itm in collection)
            {
               this.Remove(itm);
            }
            deferNotification = false;
            OnCollectionChanged(new System.Collections.Specialized.NotifyCollectionChangedEventArgs(System.Collections.Specialized.NotifyCollectionChangedAction.Reset));
        }

Now, the only thing to do is to override OnCollectionChanged method to involve deferNotification flag

protected override void OnCollectionChanged(System.Collections.Specialized.NotifyCollectionChangedEventArgs e)
       {
           if (!deferNotification)
           {
               base.OnCollectionChanged(e);
           }
       }

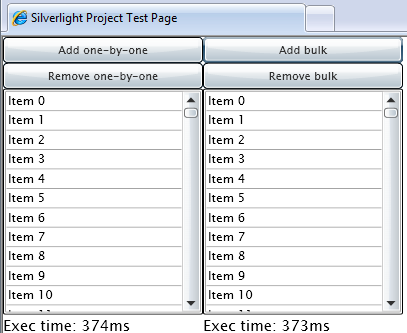
We done, so for 500 items bulk update this method works very fast, however what’s happen with 1000 items?

image

Not so good. When collection Dramatically changed renderring engine regenerates all items in bounded controls. Thus it will be almost the same time as for regular one-by-one method.

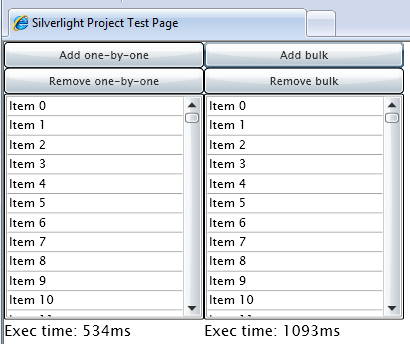
Things even worth with more, then 2000 items. If we already have 1500 items in our collection and adding another 500 items, we’ll regenerate all 2000 items by calling OnCollectionchnaged with Reset params. So it twice slower, then adding items one-by-one.

image

What to do? Work smart – add bulks when requires and single items when the collection is big. Have a nice day and be good people.

Source code for this article

Monday, May 12, 2008

Search and highlight any text on WPF rendered page

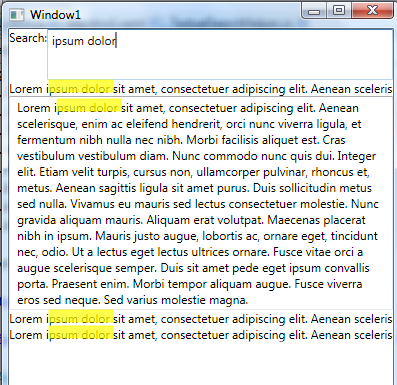
Today we’ll speak about how to search and select text on WPF page. This is not about how to search data sources, or how to search for data. This is visual search. Like this one

image

Let’s see how XAML looks like

<Grid Name="root">

<StackPanel Grid.ColumnSpan="2" Grid.Row="1" Name="panel">
            <TextBlock Name="tb" Text="Lorem ipsum dolor

<RichTextBox>
                <FlowDocument>
                    <Paragraph>
                        Lorem ipsum dolor

<ContentControl >
                <ContentControl.ContentTemplate>
                    <DataTemplate>
                        <TextBlock>
              <Run Text="Lorem ipsum

<ContentControl Content="{Binding Path=Lorem}"/>
            <DocumentPageView DocumentViewerBase.IsMasterPage="True" Grid.Row="1" Grid.ColumnSpan="2" Name="viewer"/>
        </StackPanel>

As you can see it’s various controls. Some with hard coded text in it, some with content, some with binding and some, even, with Fixed or Flow documents, loaded from external source. So how to search for some text all over the WPF application?

First attempt: Reflection and AttachedProperties

My first attempt was to use attached properties. It looks like very good way to provide such functionality. I can “attach” my property to those controls, I want to search in and then, just test and compare string of well-known control in well-known property. For example if I want to search inside Text property of TextBox, I’ll use following syntax:

<TextBlock Name="tb" l:TextualSearch.IsEnabled="True" l:TextualSearch.SearchPath="Text" Text="Lorem ipsum d

Then in code-behind, I can test if it’s dependency or CLR property. We can use it, by using DependencyPropertyDescriptor

FrameworkElement fe = o as FrameworkElement;
            if (fe != null && searchTargets.ContainsKey(fe))
            {
                Type tt = fe.GetType();
                string pn = e.NewValue.ToString();
                DependencyPropertyDescriptor dpd = DependencyPropertyDescriptor.FromName(pn, tt, tt);
                //this is Dependency property
                if (dpd != null)
                {
                    searchTargets[fe] = dpd.DependencyProperty;
                }
                //this is CRL property
                else
                {
                    searchTargets[fe] = tt.GetProperties(BindingFlags.Public | BindingFlags.FlattenHierarchy | BindingFlags.Instance).SingleOrDefault(p => p.Name == pn);
                }
            }

After we have all sources and all targets, we can attach to Text changed event externally

TextBox tb = o as TextBox;
            if (tb != null)
            {
                if (!searchSources.Contains(tb) && ((bool)e.NewValue))
                {
                    tb.TextChanged += OnSourceTextChanged;
                    searchSources.Add(tb);
                }
                else if (searchSources.Contains(tb) && !((bool)e.NewValue))
                {
                    tb.TextChanged -= OnSourceTextChanged;
                    searchSources.Remove(tb);
                }
            }

And search

ICollection<FoundItem> results = new List<FoundItem>();
            foreach (KeyValuePair<FrameworkElement, object> o in searchTargets)
            {
                object tso = null;
                if (o.Value is DependencyProperty)
                {
                    tso = o.Key.GetValue((DependencyProperty)o.Value);
                }
                else if(o.Value is PropertyInfo)
                {
                    tso = ((PropertyInfo)o.Value).GetValue(o.Key,null);
                }
                if (tso is string && tso.ToString().Contains(text))
                {
                    //got it!
                    FoundItem fe = new FoundItem(o.Key);
                    Rect cb = VisualTreeHelper.GetContentBounds(o.Key);
                    results.Add(fe);
                }
                else
                {
                    //TODO: What can it be? FlowDocument, FixedDocument? Handle it!
                }

But this is not very nice method and it have a lot of problems. For example, how I know what the coordinate of text I found. How to select it? How to treat all possible types of controls? We should try another way

Second attempt: Glyphs and Visuals

If you look into VisualTreeHelper, you’ll see GetDrawing method. It returns actual drawing, processed by WPF rendering engine. So, what WPF doing with text? Make it be fixed by using GlyphRuns inside GlyphRunVisual. So we can seek for all GlyphRuns in our application, enumerate it and search inside Characters array of the glyph to compare to required string. This methods looks much better, then the previous one. Let’s get all element in our application. In order to do it, we should enumerate all visuals in visual tree. Simple recursive method bring us flat list of all DependencyObjects in our visual tree

static void FillVisuals(DependencyObject current, ref List<DependencyObject> objects)
        {
            objects.Add(current);
            int vcc = VisualTreeHelper.GetChildrenCount(current);

            for (int i = 0; i < vcc; ++i)
            {
                DependencyObject vc = VisualTreeHelper.GetChild(current, i);
                FillVisuals(vc, ref objects);
            }
        }

Next, we have to get all Drawings and seek inside it for all GlyphRunDrawings

static List<GlyphRunVisual> GetAllGlyphsImp(FrameworkElement root)
        {
            List<GlyphRunVisual> glyphs = new List<GlyphRunVisual>();

            List<DependencyObject> objects = new List<DependencyObject>();
            FillVisuals(root, ref objects);

            for (int i = 0; i < objects.Count; i++)
            {
                DrawingGroup dg = VisualTreeHelper.GetDrawing((Visual)objects[i]);
                if (dg != null)
                {
                    for (int j = 0; j < dg.Children.Count(); j++)
                    {
                        if (dg.Children[j] is DrawingGroup)
                        {
                            DrawingGroup idg = dg.Children[j] as DrawingGroup;
                            if (idg!= null)
                            {
                                for (int k = 0; k < idg.Children.Count(); k++)
                                {
                                    if (idg.Children[k] is GlyphRunDrawing)
                                    {

                                        glyphs.Add(new GlyphRunVisual((idg.Children[k] as GlyphRunDrawing).GlyphRun, (Visual)objects[i], (idg.Children[k] as GlyphRunDrawing).Bounds));
                                    }
                                }
                            }
                        }
                    }
                }
            }

            return glyphs;
        }

Now we have list of all Glyph runs together with their Drawings and Bounds. Actually, this is all we need in order to search and select text. How to do it? Simple. First get all chars of required string, then compare it with GlyphRun.Characters array to figure whether the required characters are exist in GlyphRun. After it, just build rectangle of found sequence and return it

public static List<Rect> SelectText(this List<GlyphRunVisual> glyphs, string text)
        {
            if (glyphs == null)
                return null;
            List<Rect> rects = new List<Rect>();
            char[] chars = text.ToCharArray();
            for (int i = 0; i < glyphs.Count; i++)
            {
                int offset = 0;
                for (int c = offset; c < glyphs[i].GlyphRun.Characters.Count - offset - chars.Length; c++)
                {
                    bool wasfound = true;
                    double width = 0;
                    CharacterHit ch = new CharacterHit();
                    for (int cc = 0; cc < chars.Length; cc++)
                    {
                        wasfound &= glyphs[i].GlyphRun.Characters[c + cc] == chars[cc];
                        width += glyphs[i].GlyphRun.AdvanceWidths[c + cc];
                        if(cc==0)
                            ch = new CharacterHit(c+cc,chars.Length);

                    }
                    if (wasfound)
                    {

                        Rect ab = glyphs[i].Bounds;
                        Rect box = new Rect(
                            glyphs[i].Visual.PointToScreen(new Point(glyphs[i].GlyphRun.GetDistanceFromCaretCharacterHit(ch), 0)),
                            new Size(ab.Width, ab.Height)
                            );

                        box.Width = width;
                        rects.Add(box);
                    }
                    offset++;
                }
            }
            return rects;
        }

How, we have everything we need to select, so let’s create adorners to highlight found sequences

public class HighLightAdorner : Adorner
    {
        Brush b;
        Pen p;
        public HighLightAdorner(UIElement parent, Rect bounds) : base(parent) {
            b = new SolidColorBrush(Colors.Yellow);
            b.Opacity = .7;
            p = new Pen(b, 1);
            b.Freeze();
            p.Freeze();
            Bounds = bounds;
        }

        public Rect Bounds
        {
            get { return (Rect)GetValue(BoundsProperty); }
            set { SetValue(BoundsProperty, value); }
        }
        public static readonly DependencyProperty BoundsProperty =
            DependencyProperty.Register("Bounds", typeof(Rect), typeof(HighLightAdorner), new UIPropertyMetadata(default(Rect)));

        protected override void OnRender(DrawingContext drawingContext)
        {
            drawingContext.DrawRectangle(b, p, Bounds);
        }
    }

And draw them on root panel

public static void DrawAdorners(this AdornerLayer al, UIElement parent, List<Rect> rects)
        {
            Adorner[] ads = al.GetAdorners(parent);
            if (ads != null)
            {
                for (int i = 0; i < ads.Length; i++)
                {
                    al.Remove(ads[i]);
                }
            }

            if (rects != null)
            {
                for (int i = 0; i < rects.Count; i++)
                {
                    Rect rect = new Rect(parent.PointFromScreen(rects[i].TopLeft), parent.PointFromScreen(rects[i].BottomRight));
                    al.Add(new HighLightAdorner(parent, rect));
                }
            }
        }

We done. Happy coding and be good people.

Source code for this article

Tuesday, May 06, 2008

DrawingBrush and deep clone in Silverlight

Today, we’ll say “They did not put it there” as lot. And start with DrawingBrush. Yes, there is no Drawing Brush in Silverlight, thus you cannot create neither hatch brush nor pattern brush in Silverlight. But we want it to be there. What to do? To enter into deep reflection
image

first thing to do is to look into Reflector. How they did another brushes… What’s the mess?

DependencyProperty.RegisterCoreProperty(0x5ef4, typeof(double));

Now very helpful. At least we know that we have TileBrush (one helpful property – Tile). What’s next? Let’s try to understand how DrawingBrush should work. Actually, it should draw our control on other surface. We cannot do this – drawing in Silverlight uses internal unmanaged methods from core dll. But we can try copy actual controls. what’s the problem? Let’s do it.

First of all, we should get the content of our UserControl – WPF, Content property of UserControl is internal! Why? “They did not put it there” (second time) Also we do not know externally when all UIElement loaded. Why? you know, ‘cos no Loaded accessible externally. “They did not put it there”. I do not want to write every time the same code, so the only way to get the content is to seek by name. But we do not know what the name of controls! Reflection! We’ll get all fields of our root control and then look for every panel

How to get and set Content property of Page (UserControl) externally.

FrameworkElement root = Application.Current.RootVisual as FrameworkElement;


FieldInfo[] fields = root.GetType().GetFields(BindingFlags.Public | BindingFlags.NonPublic | BindingFlags.Instance | BindingFlags.DeclaredOnly);
            for (int i = 0; i < fields.Length; i++)
            {
                if (fields[i].FieldType.IsSubclassOf(typeof(Panel)))
                {
                    Panel p = fields[i].GetValue(root) as Panel;
                    SetPattern(p);
                }
            }

Well, now we can get the panel and just replace Background property (the usual place of brushes) and Children property (to add actual controls inside the panel

if (p.Background == this)
            {
                p.Background = null;

                SetPatternImpl(p.ActualWidth, p.ActualHeight);

                p.Children.Insert(0, Pattern);
            }
            else if (this.Pattern!=null && p.Children.Contains(this.Pattern))
            {
                SetPatternImpl(p.ActualWidth, p.ActualHeight);
            }

Good. Now we should multiply the control. Let’s go old good WPF way and clone by using XamlReader/XamlWriter solute. WTF? There is no XamlWriter in Silverlight - “They did not put it there”. What to do? Clone ‘em all!

How to clone objects in Silverlight without XamlWriter

We need reflection. A lot of reflection, so we’ll create extended method for DependencyObject type, that clone for us the objects without XamlWriter. First of all we should create new instance of target class

public static T Clone<T>(this T source)  where T : DependencyObject
        {
            Type t = source.GetType();
            T no = (T)Activator.CreateInstance(t);

Then travel recursively inside the type get all DependencyProperties and DependencyObjects. We need DependencyProperty to use system setter and DependencyObjects to clone them too. What is DependencyProperty from reflection point of view? It’s Static, Public and not Public ReadOnly Field. So, we’ll look for those.

Type wt = t;
            while (wt.BaseType != typeof(DependencyObject))
            {
                FieldInfo[] fi = wt.GetFields(BindingFlags.Static | BindingFlags.Public);
                for (int i = 0; i < fi.Length; i++)
                {
                    {
                        DependencyProperty dp = fi[i].GetValue(source) as DependencyProperty;


Now all values of Dependency Properties are Dependency Objects or it’s ancestors, so we should be very smart (also we do not want NameProperty of cause)

if (dp != null && fi[i].Name != "NameProperty")
                        {
                            DependencyObject obj = source.GetValue(dp) as DependencyObject;
                            if (obj != null)
                            {
                                object o = obj.Clone();
                                no.SetValue(dp, o);
                            }
                            else
                            {

Also, there are some DependencyProperties, that we cannot set. How to detect them? Inside DependencyProperty class there are only two methods (Register and RegisterAttached) and no fields. Why there is no IsReadOnly (or something) property? “They did not put it there”. As well as we cannot know what the target type of the property. Another “They did not put it there”. So, we should do it manually

else
                            {
                                if(fi[i].Name != "CountProperty" &&
                                    fi[i].Name != "GeometryTransformProperty" &&
                                    fi[i].Name != "ActualWidthProperty" &&
                                    fi[i].Name != "ActualHeightProperty" &&
                                    fi[i].Name != "MaxWidthProperty" &&
                                    fi[i].Name != "MaxHeightProperty" &&
                                    fi[i].Name != "StyleProperty")
                                {
                                    no.SetValue(dp, source.GetValue(dp));
                                }
                            }

And recursive call at the end

wt = wt.BaseType;
            }

Now we have all Dependency Properties. What’s about regular CLR properties? We need them too. Let’s grab it

PropertyInfo[] pis = t.GetProperties();
            for (int i = 0; i < pis.Length; i++)
            {

                if (
                    pis[i].Name != "Name" &&
                    pis[i].Name != "Parent" &&
                    pis[i].CanRead && pis[i].CanWrite &&
                    !pis[i].PropertyType.IsArray &&
                    !pis[i].PropertyType.IsSubclassOf(typeof(DependencyObject)) &&
                    pis[i].GetIndexParameters().Length == 0 &&
                    pis[i].GetValue(source, null) != null &&
                    pis[i].GetValue(source,null) == (object)default(int) &&
                    pis[i].GetValue(source, null) == (object)default(double) &&
                    pis[i].GetValue(source, null) == (object)default(float)
                    )
                    pis[i].SetValue(no, pis[i].GetValue(source, null), null);

This will work fine for regular properties, but not for lists. There we should Add()/Get()/Remove() Items we cannot just set them. what’s the problem?

else if (pis[i].PropertyType.GetInterface("IList", true) != null)
                {
                    int cnt = (int)pis[i].PropertyType.InvokeMember("get_Count", BindingFlags.InvokeMethod, null, pis[i].GetValue(source, null), null);
                    for (int c = 0; c < cnt; c++)
                    {
                        object val = pis[i].PropertyType.InvokeMember("get_Item", BindingFlags.InvokeMethod, null, pis[i].GetValue(source, null), new object[] { c });

                        object nVal = val;
                        DependencyObject v = val as DependencyObject;
                        if(v != null)
                            nVal = v.Clone();

                        pis[i].PropertyType.InvokeMember("Add", BindingFlags.InvokeMethod, null, pis[i].GetValue(no, null), new object[] { nVal });
                    }
                }

Very well. Now we have our brand new clones ready for reuse. All we have to do is to add and layout them.

void SetPatternImpl(double width, double height)
        {
            Pattern = new WrapPanel();
            Pattern.Width = width;
            Pattern.Height = height;
            Pattern.HorizontalAlignment = HorizontalAlignment.Stretch;
            Pattern.VerticalAlignment = VerticalAlignment.Stretch;

            double xObj = (1 / this.Viewport.Width);
            double yObj = (1 / this.Viewport.Height);

            for (int i = 0; i < Math.Ceiling(xObj*yObj); i++)
            {
                Shape ns = this.Drawing.Clone();
                ns.Stretch = this.TileMode == TileMode.None?Stretch.None:Stretch.Fill;
                ns.Width = Pattern.Width / xObj;
                ns.Height = Pattern.Height / yObj;
                ScaleTransform st = new ScaleTransform();
                st.ScaleX = this.TileMode == TileMode.FlipX | this.TileMode == TileMode.FlipXY ? -1 : 1;
                st.ScaleY = this.TileMode == TileMode.FlipY | this.TileMode == TileMode.FlipXY ? -1 : 1;
                ns.RenderTransform = st;
                Pattern.Children.Add(ns);
            }
        }

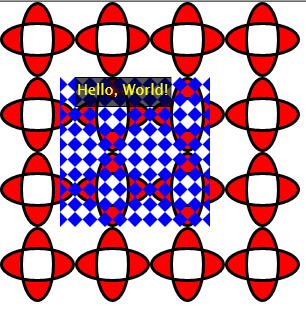
We done. How to use our bush? Simple, with regular Xaml syntax

<Grid x:Name="LayoutRoot" Width="300" Height="300">
        <Grid.Background>
            <l:DrawingBrush Viewport="0,0,0.25,0.25" TileMode="Tile">
                <l:DrawingBrush.Drawing>
                    <Path Stroke="Black" Fill="Red" StrokeThickness="3">
                        <Path.Data>
                            <GeometryGroup>
                                <EllipseGeometry RadiusX="20" RadiusY="45" Center="50,50" />
                                <EllipseGeometry RadiusX="45" RadiusY="20" Center="50,50" />
                            </GeometryGroup>
                        </Path.Data>
                    </Path>
                </l:DrawingBrush.Drawing>
            </l:DrawingBrush>
        </Grid.Background>
        <Canvas Width="150" Height="150" x:Name="canvas">
            <Canvas.Background>
                <l:DrawingBrush Viewport="0,0,0.1,0.1" TileMode="FlipX">
                    <l:DrawingBrush.Drawing>
                        <Polygon Fill="Blue" Points="0,0 1,1 1,0 0,1"/>
                    </l:DrawingBrush.Drawing>
                </l:DrawingBrush>
            </Canvas.Background>
            <TextBox Foreground="Yellow" Background="#AA000000" Text="Hello, World!" Height="30"/>

        </Canvas>
    </Grid>

I used my WrapPanel within this sample. It’s easy to build custom controls in Silverlight, much easier, then Brushes. Why? Because “They did not put it there”.

How to build layout control in Silverlight

Really simple. 1 – subclass panel

public class WrapPanel : Panel
   {

Override MeasureOverride

protected override Size MeasureOverride(Size availableSize)
{
    foreach (UIElement child in Children)
    {
        child.Measure(new Size(availableSize.Width, availableSize.Height));
    }

    return base.MeasureOverride(availableSize);
}

Then ArrangeOverride and you done!

protected override Size ArrangeOverride(Size finalSize)
        {

            Point point = new Point(0, 0);
            double maxVal = 0;
            int i = 0;

            if (Orientation == Orientation.Horizontal)
            {
                double largestHeight = 0.0;

                foreach (UIElement child in Children)
                {

                    child.Arrange(new Rect(point, new Point(point.X + child.DesiredSize.Width, point.Y + child.DesiredSize.Height)));

                    if (child.DesiredSize.Height > largestHeight)
                        largestHeight = child.DesiredSize.Height;

                    point.X = point.X + child.DesiredSize.Width;

                    if ((i + 1) < Children.Count)
                    {
                        if ((point.X + Children[i + 1].DesiredSize.Width) > finalSize.Width)
                        {
                            point.X = 0;
                            point.Y = point.Y + largestHeight;
                            maxVal += largestHeight;
                            largestHeight = 0.0;
                        }
                    }

                    i++;

                }
                if (AllowAutosizing)
                {
                    finalSize.Height = maxVal;

                    //this is ugly workaround, 'cos ScrollViewer uses Height property instead of ActualHeight
                    if (this.Height != maxVal)
                        SetValue(HeightProperty, maxVal);
                }
            }
            else
            {
                double largestWidth = 0.0;

                foreach (UIElement child in Children)
                {
                    child.Arrange(new Rect(point, new Point(point.X + child.DesiredSize.Width, point.Y + child.DesiredSize.Height)));

                    if (child.DesiredSize.Width > largestWidth)
                        largestWidth = child.DesiredSize.Width;

                    point.Y = point.Y + child.DesiredSize.Height;

                    if ((i + 1) < Children.Count)
                    {
                        if ((point.Y + Children[i + 1].DesiredSize.Height) > finalSize.Height)
                        {
                            point.Y = 0;
                            point.X = point.X + largestWidth;
                            maxVal += largestWidth;
                            largestWidth = 0.0;
                        }
                    }

                    i++;
                }
                if (AllowAutosizing)
                {
                    finalSize.Width = maxVal;

                    //this is ugly workaround, 'cos ScrollViewer uses Width property instead of ActualWidth
                    if (this.Width != maxVal)
                        SetValue(WidthProperty, maxVal);
                }
            }

            return base.ArrangeOverride(finalSize);
        }

We done. Here how it looks like. Have a nice day and be good people

This is not final control, there are some limitations

  • It works with Panels only
  • It does not layout (thus you cannot use it with StackPanel for example)
  • You should name hosting control (I explained why)
  • For drawings inside DrawingBrush you can use only Shape derived classes (e.g. Line, Polygon, Ellipse, Path etc)

You are more, then welcome to enhance this control, ‘cos it does not looks like Microsoft going to have DrawingBrush in RTM of Silverlight. The only request is – submit and share your enhancements to help all other developers and make their live easier with this necessary control. Source code for this article

Monday, May 05, 2008

Performance appliance of RenderTargetBitmap

Challenge: draw complicated Path and animate anything over it
Problem: high CPU while animating object
So, we got another challenge – draw Path object with thousand of points and animate another object over the Path by having least possible impact on CPU. What’s the problem?

First of all, let’s create out XAML

<Path Name="path" Stroke="Black" StrokeThickness="1" Data="{x:Static l:Window1.Data}"/>   

and generate graphics geometry for it

public static Geometry Data
        {
            get
            {
                for (int i = 0; i < 1024; i++)
                {
                    pts.Add(new Point((double)rnd.Next(2000), (double)rnd.Next(2000)));
                }

                StreamGeometry geometry = new StreamGeometry();
                geometry.FillRule = FillRule.EvenOdd;
                using (StreamGeometryContext ctx = geometry.Open())
                {
                    ctx.BeginFigure(new Point(0, 0), false, false);
                    ctx.PolyLineTo(pts, true, true);
                }
                return (Geometry)geometry.GetAsFrozen();
            }
        }

Next, let’s create simple rectangle and animate TranslateTransform object, relays in RenderTransform collection

redRect.Width = 100;
            redRect.Height = 100;
            redRect.Fill = Brushes.Red;
            redRect.HorizontalAlignment = HorizontalAlignment.Left;
            redRect.RenderTransform = trans;

root.Children.Add(redRect);
            DoubleAnimation da = new DoubleAnimation(0, this.ActualWidth, new Duration(TimeSpan.FromSeconds(10)));
            da.Completed += (EventHandler) delegate {root.Children.Remove(redRect);};
            trans.BeginAnimation(TranslateTransform.XProperty, da);

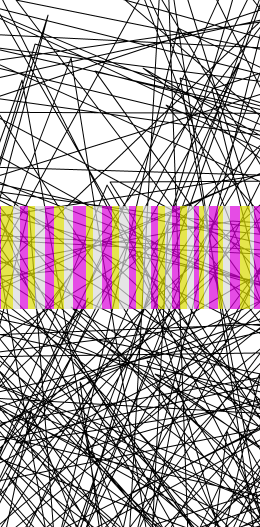
Animating RenderTransform collection is the most efficient way to change things in WPF visual tree. It does not tickles the tree, does not performs layout and rendering engine is very smart to update only dirty regions. 

See yourself (dirty regions update is colored)

image

Very well. Let’s see CPU rate – 60%? WTF? Why? I’m using most performant RenderTransform, transforming only necessary things and doing it over static object. Static? Well, it’s retained object, so WPF trying to redraw each region under the moving object. What to do?

We can try to use Adorners. It might help us to avoid underlying object redraw.

So, we’ll create our own Adorner, that knows to hold UIElement inside it

class CanvasAdorner : Adorner
        {
            UIElement parent,child;
            List<UIElement> children;
            public CanvasAdorner(UIElement adornedElement, UIElement Child)
                : base(adornedElement)
            {
                children = new List<UIElement>();
                parent = adornedElement;
                Add(Child);
            }

Then we’ll create adorner layer from our root panel and animate rectangle inside it.

AdornerLayer layer = AdornerLayer.GetAdornerLayer(root);
            CanvasAdorner ca = new CanvasAdorner(root, redRect);
            layer.Add(ca);
            DoubleAnimation da = new DoubleAnimation(0, this.ActualWidth, new Duration(TimeSpan.FromSeconds(10)));
            da.Completed += (EventHandler)delegate { layer.Remove(ca); ca.Remove(redRect); };
            trans.BeginAnimation(TranslateTransform.XProperty, da);

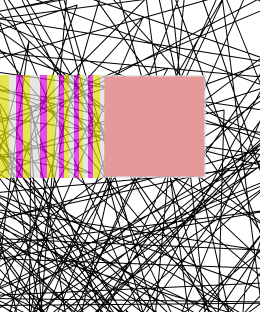
We should see performance boost? No, we’re not. This is because of rendering engine, that draws everything together

image

It still works very hard to redraw each pixel in geometry.

What to do? We can either create new DirectX surface and draw over it or, maybe another rendering (or UI) thread? Net very simple solution. I prefer “GDI+ way”.

What is it? Don’t you remember, old good way, when we pin pixels in bitmap in order to make visual cache? We can do it in WPF too. To do it, we’ll use RenderTargetBitmap object. This object knows convert WPF Visual into Bitmap and this is exactly what we need.

So we’ll create Image and it source will be our Visual, rendered by RenderTargetBitmap (this is software accelerated!)

RenderTargetBitmap rtb = new RenderTargetBitmap((int)path.ActualWidth, (int)path.ActualHeight, 96, 96, PixelFormats.Pbgra32);
            rtb.Render(path);
            rtb.Freeze();
            root.Children.Remove(path);
            Image img = new Image();
            img.Stretch = Stretch.None;
            img.Source = rtb;
            root.Children.Insert(0,img);

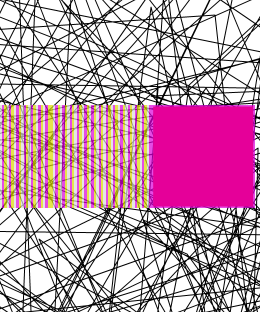
Now we can move and animate our rectangle over bitmap. It still works and renders only necessary regions (BTW, pay attention, that those regions much smaller, thus animation performance is much better), but what’s happened with CPU?

image

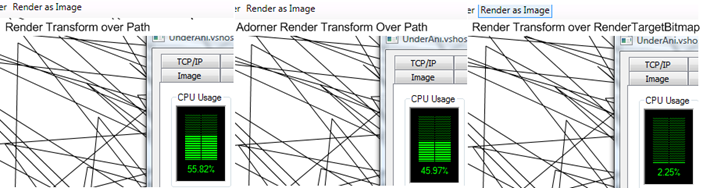
It’s around 2% – we reach the goal. But why his happens? What the difference between rendering Path and Bitmap? After all both pixels – yes, but in Bitmap case those pixels are not retained, thus rendering thread almost does not work. See the CPU comparison for three of those methods

 image

Don’t it really cool? There are some problems with this method – one of those problem (and most serious) is that creation of RenderTargetBitmap and it’s rendering takes a lot of time and CPU (in my case it was about 0.5 seconds) another problem, that we’re playing with Visual and Logical tree, so we’re rerender and layout whole application window twice – before and after creation. However even with those problems this way is the best to get performant animation over retained WPF objects.

Have a nice day and be good people. Source code for this article.

Friday, May 02, 2008

Stand alone multiplatform Silverlight application

Recently we spoke about running Silverlight application as client side only stand alone application. I used WebBrowser, MSHTA and Silverlight OCX with a little bit interop to make it running. In comments, Laurent Bugnion show me his method, that was pretty similar to mine, except the fact, that he used managed code to access file system. But more interesting comment come from Christophe Lauer, who tried to run Silverlight as completely stand alone application, by using Cassini embedded  into windows application, that actually represents web server for Silverlight hosting.

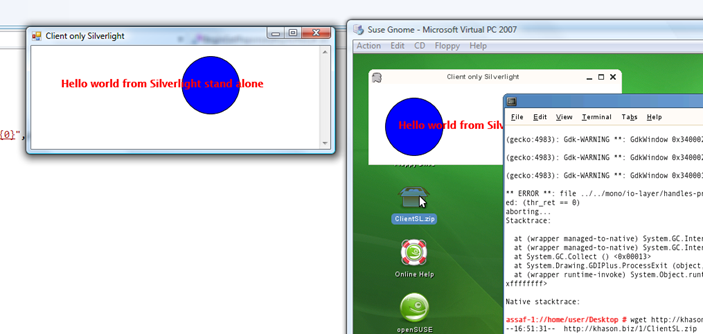
Inspired by this idea, I decided to implement my own small web server suitable to Silverlight hosting and embed it into my application. Then, compile and run it on Linux. That’s the result – It’s working!

image

How to do this? Simple – we have a lot of handy classes in C# in order to make small web server, that only knows to dispatch static files with appropriate mime types. Here we go. First of all, we’ll create simple WinForms application, that has WebBrowser inside it. Then we’ll use TcpListener to create our server socket and give it’s local address to embedded web browser, that will create requests.

listener = new TcpListener(IPAddress.Any, port);
listener.Start();
BeginGetReponse(null);
webBrowser1.Url = new Uri(string.Format("http://localhost:{0}",port));

Now, we should start listening and one got request, response it

void BeginGetReponse(IAsyncResult ar)
       {
           try
           {
               if (ar == null)
               {
                   listener.BeginAcceptSocket(BeginGetReponse, null);
                   return;
               }
               Socket socket = listener.EndAcceptSocket(ar);
               if (socket.Connected)
               {
                   byte[] inbuffer =  new byte[1024];
                   int br = socket.Receive(inbuffer);
                   string req = Encoding.ASCII.GetString(inbuffer, 0, br);

How could we know what file to dispatch? See http header of cause. (Note – this is ugly, quick and dirty solution only for POC)

string s = req.Split(' ')[1];
                    string send = string.Empty;
                    string mime = "text/html";

                    if (s == "/")
                    {
                        send = Resources.Default;
                    }
                    else if (s == "/Page.xaml")
                    {
                        send = Resources.Page;
                        mime = "application/xaml+xml";
                    }

How we have to create the same header our self and response with content

const string httpHeader = "HTTP/1.1 200 OK\r\nServer: WeirdThing1.1\r\nContent-Type: {0}\r\nAccept-Ranges: bytes\r\nContent-Length: {1}\r\nConnection: Close\r\n\r\n{2}";

byte[] data = Encoding.ASCII.GetBytes(send);
byte[] resp = Encoding.ASCII.GetBytes(string.Format(httpHeader, mime, data.Length, send));
br = socket.Send(resp);

We done. Now it works in Windows, but will it work in Linux? Let’s see…

First of all we have to add libgluezilla package to be able to use WebBrowser in mono. This is Gecko engine, that clues base browser core into Winforms. Very cool. That’s all we need. Right now we can just run our application “as-is” by using mono prompt and it will work.

The only small problem, that Moonlight plugin does not know, that it can run on Gecko (it is not FireFox). But small woodoo with it’s sources solves the problem. And now we can either continue to run it as it (with mono prompt) or compile it by using NAnt to work natively.

From here, as you, probably understand, the sky is the limit – create 1 socket by using C++ and run it whenever Silverlight can run. Also, you can even use Windows 2008 core (it has small IIS inside) to run it.

Have a nice day and be good people. Source code for this article.